
In my previous post about Power Platform source control through the new Git feature, I went through how Git works, its purpose, and how to get started. In today’s post, I’m diving a bit deeper into branching strategy. This concept seems to be a bit ambiguous in the Microsoft Learn Docs, and I have heard various ideas around this topic as well. The one thing to keep in mind is that a branching strategy for this Git feature is a bit wonky compared to your standard Git/YAML pipelines. I’m not saying it is complicated, it’s just a bit weirder to set up at first. Let’s jump into it.
Git Branching Fundamentals
Taking a small step back, I think it is imperative to firstly understand the concept of branches, commits and merges.
Within any traditional DevOps tool, be it Azure DevOps, GitHub or even Bitbucket, your source code for any code-based repository lives in a branch called main. This is the final boss branch, where all production-based code is likely consolidated correctly and stored. When you have multiple developers working on the same project and all contributing to common artefacts, having all these developers working in main is like editing solution objects in your production environment. The safest option for collaboration is for each developer to get access to a copy of the solution (in this case, a copy of main) and apply their changes to that branch. Just like a development environment, this allows developers to apply changes to the solution safely in an isolated branch.
Extending this to collaboration, if you have multiple people working on the same project, you would likely create each contributor their own branch. This means each developer will then get their own isolated copy of the source code in main. Based on your project structure, these branches can be named for individual use and contributions or can be named for specific feature contributions. Within standard Git branching strategies, developers can easily switch between branches when developing.
This is where Power Platform Git differs. Aligning to Power Platform Git source control, a repository is bound to an environment and branches are bound to a solution. This results in developers being unable to easily switch between branches as and when needed. This is where a Power Platform Git Branching Strategy comes into play. I find it ideal to make use of the developer’s name and feature. Remember in my last post I spoke about disposable environments; this is where that becomes applicable again, creating and dropping environments as needed for each branch.
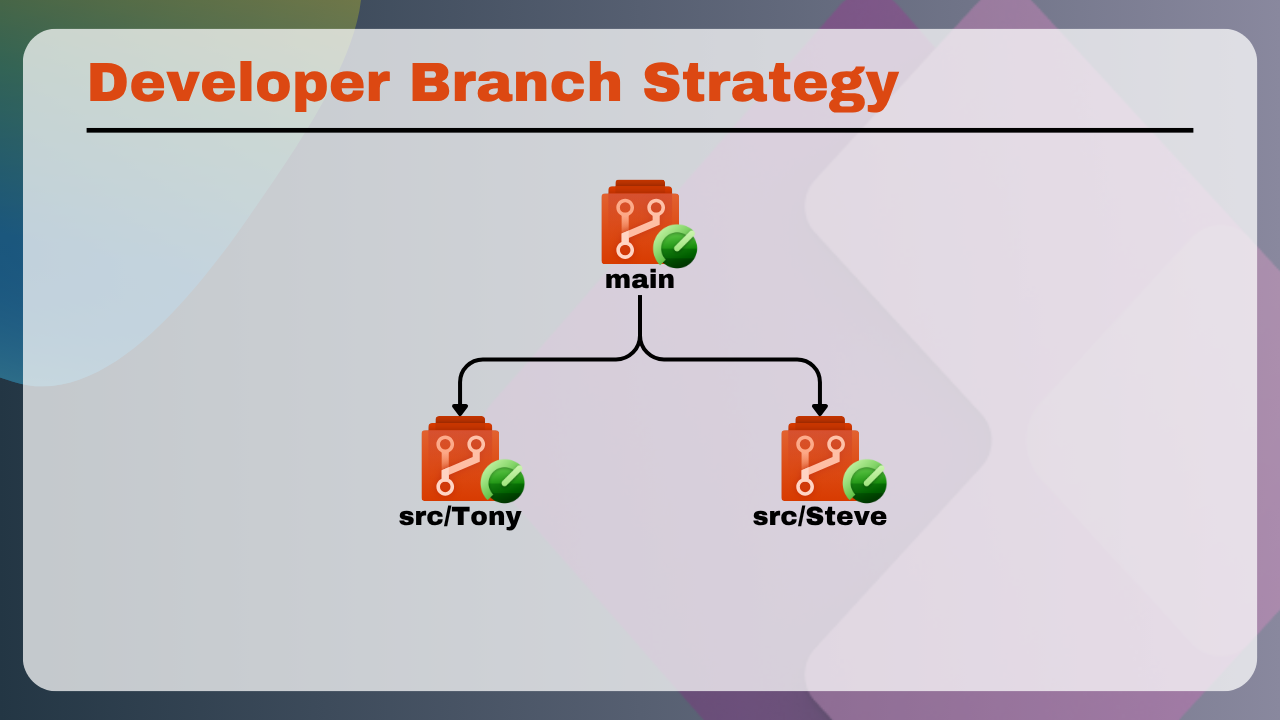
Once your development in a designated branch is complete, you can commit your changes to your branch and request a merge. This triggers an approval (if set up correctly) for the DevOps lead to review the changes in your branch and merge those changes into main. So if Steve worked on a feature in the contacts page of a Canvas app, and Tony worked on a feature in the engagement page, the merge will ensure that the code in main is updated with both Steve’s and Tony’s changes.
Main and your Core Development Environment
With the basics of branching covered, binding a solution/environment to a branch in DevOps is straightforward. If you are not sure how to do this, I covered this topic in my last post, Getting Started with Power Platform Git Source Control.
The tricky bit is, how do I get artefacts into main and then create branches and environments? As mentioned before, main is your primary branch. This branch should be created once you have initiated a repository in Azure DevOps. This branch then needs to be bound to a solution or an environment. In today’s post, I’m working with bound solutions. When binding your solution to the repository, ensure that it is in fact actually bound to the main branch. Now that you have your “main” solution in the “main” environment, create a blank canvas app and create a commit so the unpacked solution is stored within the DevOps repo. From here on out, all other branches and developer environments will be based on what exists in the main and this core development environment.
Development Branches and Developer Environments
For the purpose of this post, I will be using two branches, one for Tony and one for Steve. As mentioned earlier, Tony and Steve are working within the same Canvas app, but on different pages. They’re also working on a variety of additional objects to help drive their page development. Because I have a branch for each developer, I therefore need an environment for each developer as well. We need to have an isolated environment per developer, as a key limitation of the Git feature does not allow for a single environment to be bound to multiple repositories.
Within each developer environment, we need to visualise these as if they’re branches themselves, as in, the two development environments will ultimately merge with the main dev environment. To create this association as well, you need to create the solution in both developer environments. You need to create a new solution with the same name and publisher that exists in the Dev main. The naming convention needs to be spot on, as a single mistake will result in the source control breaking. Once these solutions have been created, you can bind them to a branch.
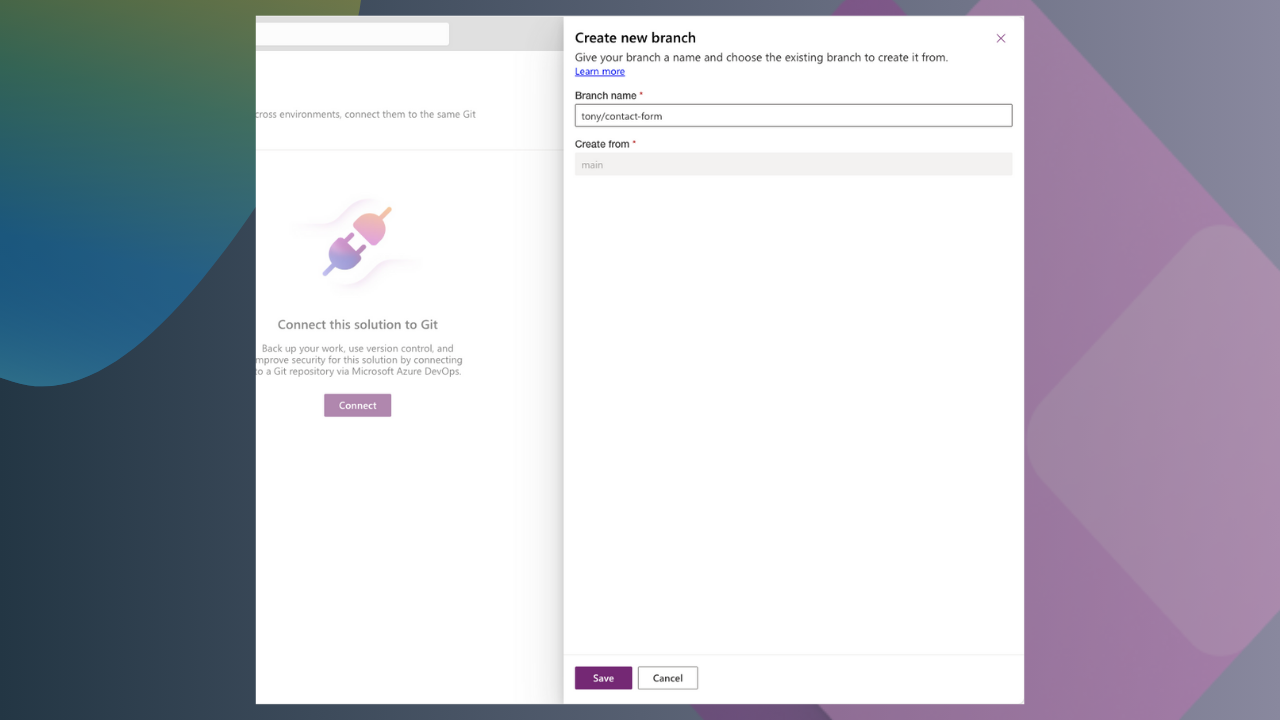
When binding each solution to the project, you will be prompted to select a branch. Below the dropdown, be sure to create a new branch. Ideally name the branch in relation to the developer environment or the feature that isolated environment will be working on. Be sure to ensure that the branch is being created from main. Create the branch and continue with binding the solution.
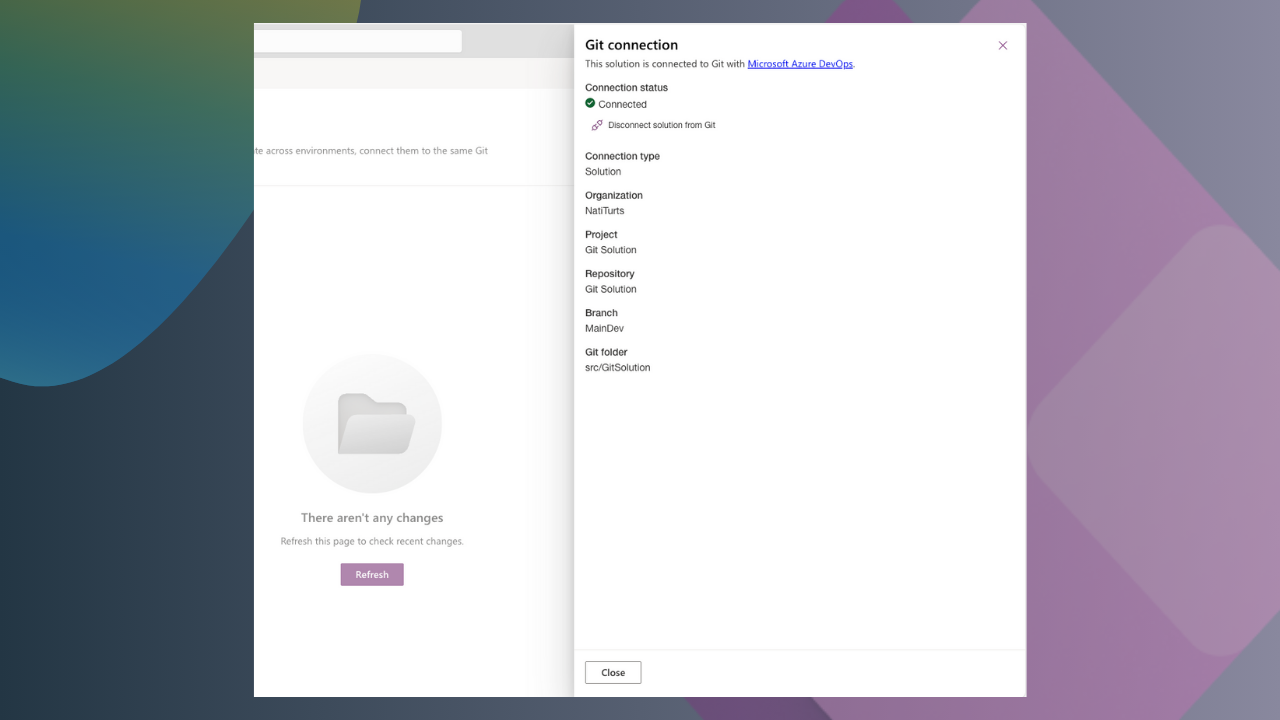
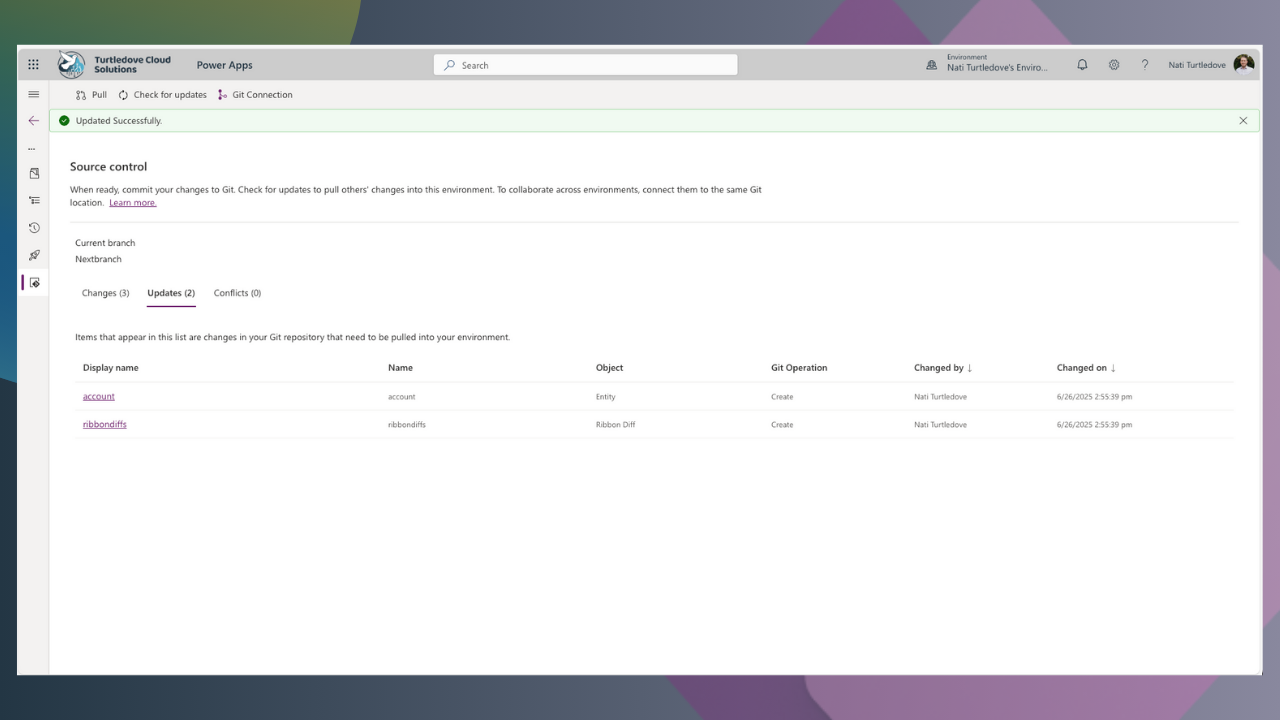
Once you have successfully bound the solution to the DevOps repository and have branched off main, you should be able to see the solution’s source control with a list of tracked changes below. This list represents the changes you make to your copy of the solution within your solution and branch. More importantly, within this page, you should be able to see a list of updates as well. These updates become available when changes have been made to the main branch and reside within the core dev environment. You can always check for updates by clicking the “Check for updates” button.
Because we already committed the solution and a blank canvas app to main through the core dev environment, the isolated branch will contain the blank app and can match the solution in main to the solution in the isolated environment through the name and publisher. You should therefore be able to see updates within your source control and the Pull option in the top navigation pane. By clicking the “Pull” button, you are requesting that all updates and changes residing in main, that do not currently exist in the isolated branch and environment, be retrieved from the main branch and core dev environment and be applied to the isolated developer environment. This now ensures that the isolated developer environment is up to date with main, and appropriate changes can be added now.
Pulling, Merging, and Staying in Sync
Once you have all your developer environments and branches up and running, it’s imperative that you commit, pull and sync whenever you can. This ensures that your work is always stored safely, but more importantly, that your peer developers published work is synced to your branch when required, ensuring you are building on the latest solution.
It would be ideal to designate someone as the DevOps lead, as this allows them to manage all the code being stored across the various branches. When it comes to updating your branch with other development done elsewhere, the DevOps lead will be responsible for ensuring you are receiving tested and final builds. They can ensure this by managing pull requests. How does this work? When you commit your work done in Power Platform to your branch, the branch in DevOps will update. The DevOps lead will be working directly in DevOps as well, allowing them to merge your branch with main. This means that they will proof your changes, make sure it does not impact any work done by others, and that no complications arise. Once they merge your branch to main, the change you made will now be published. This means that another developer working on different artefacts has a solution that is now behind and therefore needs to pull the changes from main into their environment. Once they create a pull request, the changes made to the main and in the core dev will be updated to their developer environment and branches.
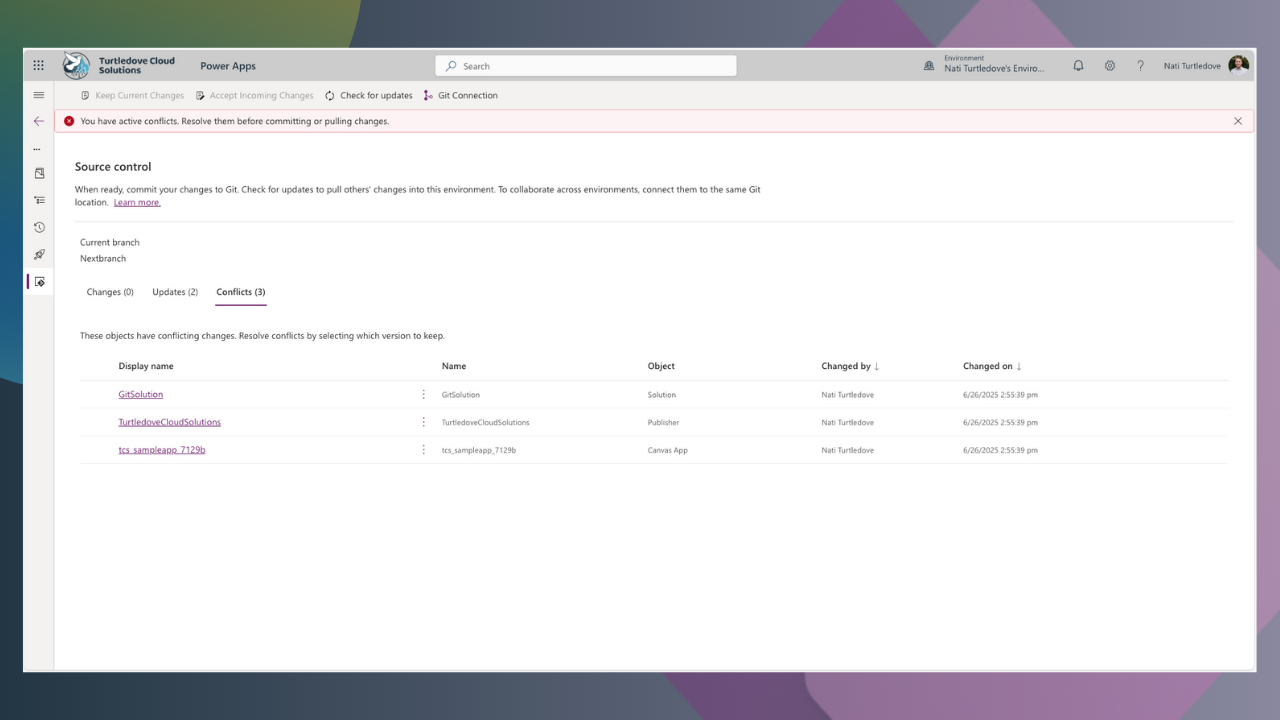
What to Watch Out For
Of course every feature and tool comes with limitations and issues. When you plan on creating a pull request, you may encounter conflicts. Conflicts represent changes that exist in your branch as well as in main. For example, if you are working on a page and edited a text field labelled txt_HomeScreen_Username but someone else also made changes to this field as well and already merged to main, you may need to decide what parts you choose to override when doing a pull request. This is why you should try to keep your branch as synced as possible.
From a DevOps lead’s perspective, if two developers are working on the same object and both commit their isolated branches, it becomes painful for the DevOps lead to review the differences and merge the two conflicting branches together. Having a structured strategy as to how you want to manage branch and feature development can save plenty of time and a tonne of frustration when it comes to merging and deployments.
Structuring Your Repo
Because branching can become overly complicated, it’s important your folder structure in Git has been given some serious thought. My proposal for smaller-scale projects are to structure your branches as per your developer environments.
/main/GitSolution
/development/Tony/GitSolution
/development/Steve/GitSolution
You can also introduce a featured branch strategy for larger and more complex projects, such as:
/main/GitSolution
/feature/tony-contact-form/GitSolution
/feature/tony-contact-view/GitSolution
/feature/steve-account-form/GitSolution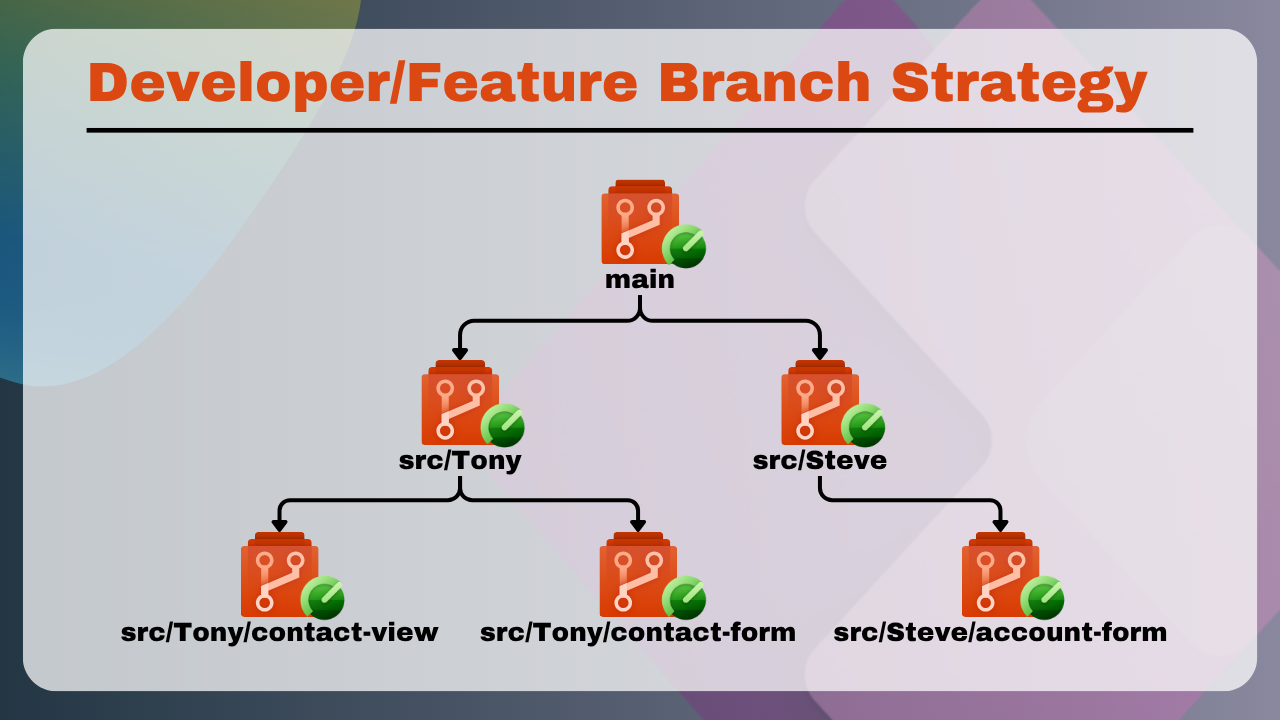
This mirrors what each environment sees and helps avoid confusion when you’re navigating between branches.
A Real-Life Scenario
To finish off this post, let’s use a real-life practical scenario. I need to add a new table to my solution. The first thing I need to do is spin up a new development environment and create the solution (same solution name and publisher). Once I’ve done that, I can bind the solution to my DevOps project and create a new branch based on main.
Now that my new environment and solution are bound to the new DevOps branch, I can check for updates and will see that I have incoming updates. I can now initiate a pull request from the solution allowing any updates that were previously merged to main by other branches to now be applied to the solution I am currently working on.
Now in a perfect world, this should work, and your environment and solution should be up to date and synced with main. However, in the crazy world we live in, issues do happen. One of which is related to this scenario. Committing tables and specific objects to source control works, however, pulling these tables and objects back into a solution does not always work. You may receive an “Invalid Argument” error, and you’re not alone. Hopefully these limitations are attended to soon.
Final Thoughts
As mentioned in my previous blog, this is a really big step forward for Power Platform, but I would not call it real source control just yet. Not being able to manage tables and various other objects through Git is a real blow to this feature, but I hope these issues are updated.
A lot of thought needs to go into your source control strategy from the start as well. Get this right, and it’s a great starting point for Canvas app based solutions.


Hiya Nati, interesting article this. I’ve just finished testing it out since it went into GA and for me, the tech is there, but it’ll add far too much admin to make it worthwhile.
I had to import the solutions from golden dev to a branched env and took ages to get it all setup. That’s fine, but merging from main only being possible in ADO, or a local tool like VS or gitkraken is poor. Once they hopefully bring merging in natively, I think this is good to go.
I plan on doing a discussion video on this, I’m wondering if you’d like to take part?