STOP EXPOSED API KEYS IN HEADERS!!!
This is a two-part post, the reason being that I experimented with two different approaches to solve a problem. One works much better than the other, but both are good practices when using API keys. For that reason, this post, Build a Secure Azure AI Custom Connector, has the same intro and problem statement as my blog, Secure Your APIs with Azure Key Vault.
I’ve now written two blog posts about leveraging AI models through HTTP requests within Power Automate. I looked at prompting the OpenAI model as well as a personal Azure AI deployment. Similar to various other posts out there, the basic and conventional route to introduce this type of concept, whether you’re using Azure AI, OpenAI, or any other endpoint for that matter, is to include your API key within your HTTP request header.
As an introductory post on how one can leverage those services within Power Platform, I’d say it’s a great start. But let’s not use this method as a viable option for solution architecture and development. Authentication within headers is not a permanent resolution. It is incredibly insecure, and anyone with access to the flow would therefore have access to the API Key as well.
In todays post, we’re diving into the preferred method of managing APIs in headers. The Custom Connector route. Let’s get started.
The Problem
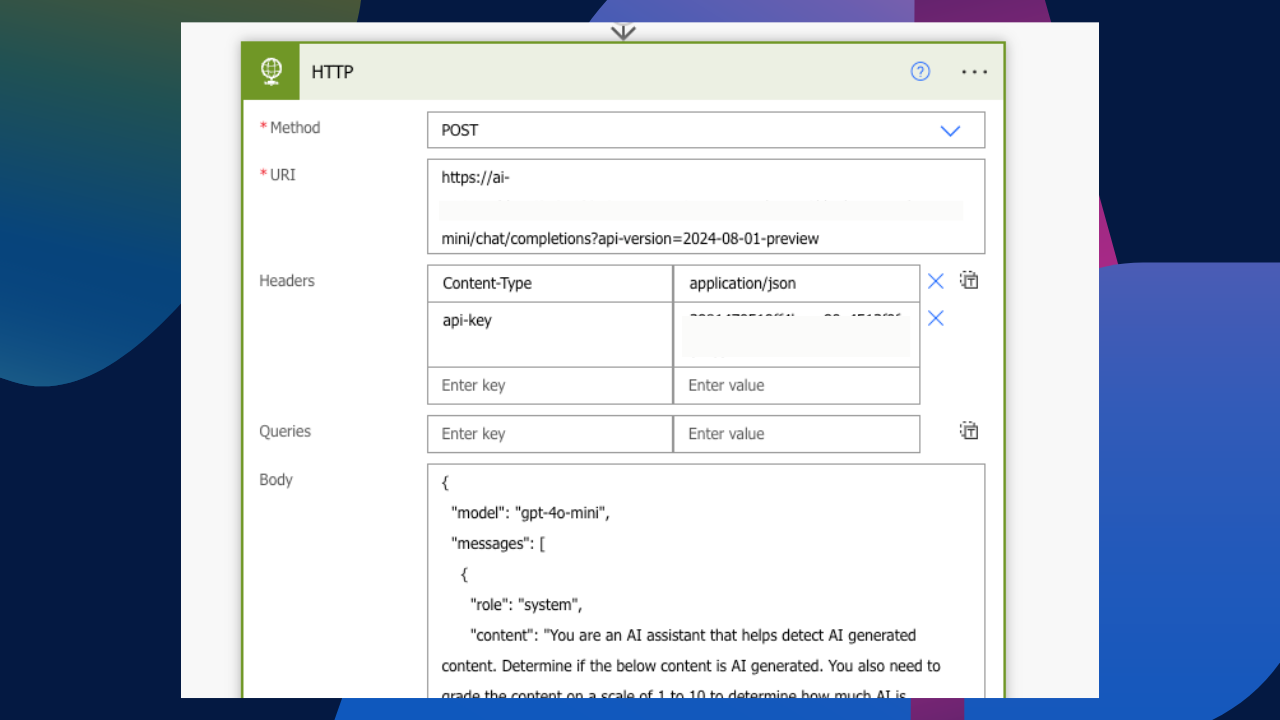
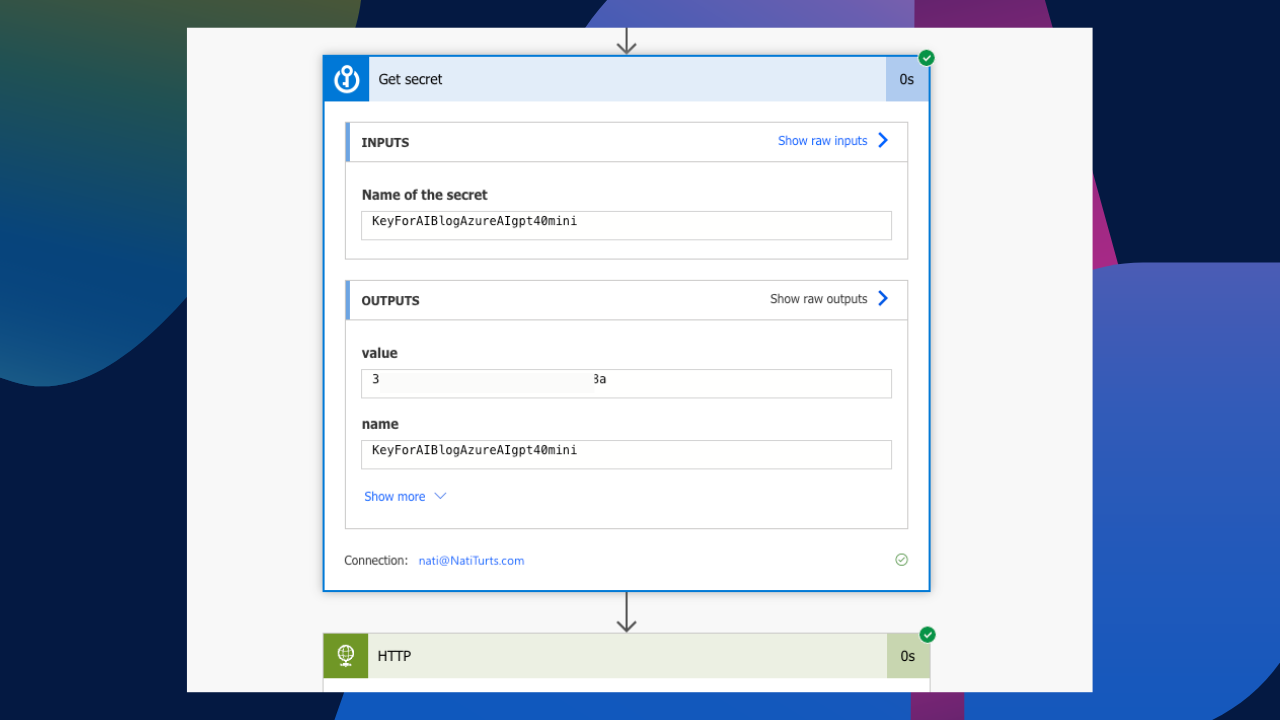
As mentioned earlier, adding an API to an HTTP header is great for testing endpoints and authentications; it’s basically a step further from using Postman. But having this as a production running flow is really not ideal. Seriously, does the below look safe? In my post, Secure Your APIs with Azure Key Vault, we identified how we could solve this problem using Azure Key Vault while securing the input and outputs of the flow actions to redact the retrieved key value in the flow run history.
Creating a Custom Connector
My favourite route to solve this problem of placing API keys directly in HTTP request headers is to stop using HTTP requests and create a custom connector instead. A custom connector allows us to wrap HTTP protocols into a solution that offers both us and end users the ability to interact with requests or various other functions through secure means. Let’s create a custom connector for our AI deployment.
General
Within make.powerapps.com, we can either head over to Discovery and select Custom Connectors. Here we can simply create a new connector from scratch. Alternatively, if you’re OCD like me and do things the solution way, you can also create the connector from within a solution. The custom connector is located under New > Automation > Custom Connector.

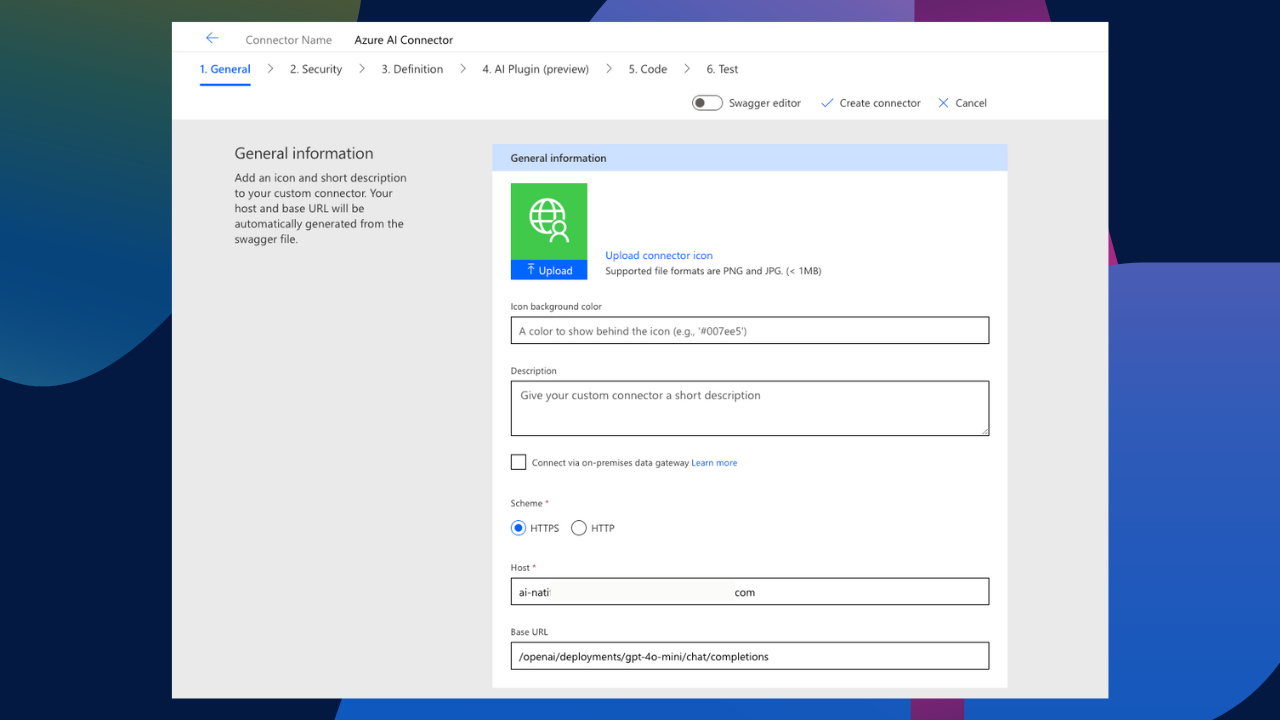
Give the custom connector a name, upload an icon, create a description, and make it look pretty. More importantly, we need to assign a host and base URL for our connector to interact with. For our host value, we need to use the endpoint for our AI deployment, but only the domain, not the https schema or the suffix urls and parameters. For example, if our endpoint for the deployment is https://ai-natiturtsblogai2123123123123.openai.azure.com/openai/deployments/gpt-4o-mini/chat/completions?api-version=2024-08-01-preview*, we only need the ai-natiturtsblogai2123123123123.openai.azure.com part of it for our connectors host.
For the base url, we can then place the additional url suffixes in it to ensure that the connector points to the correct API. The configuration should look something like this:
Security
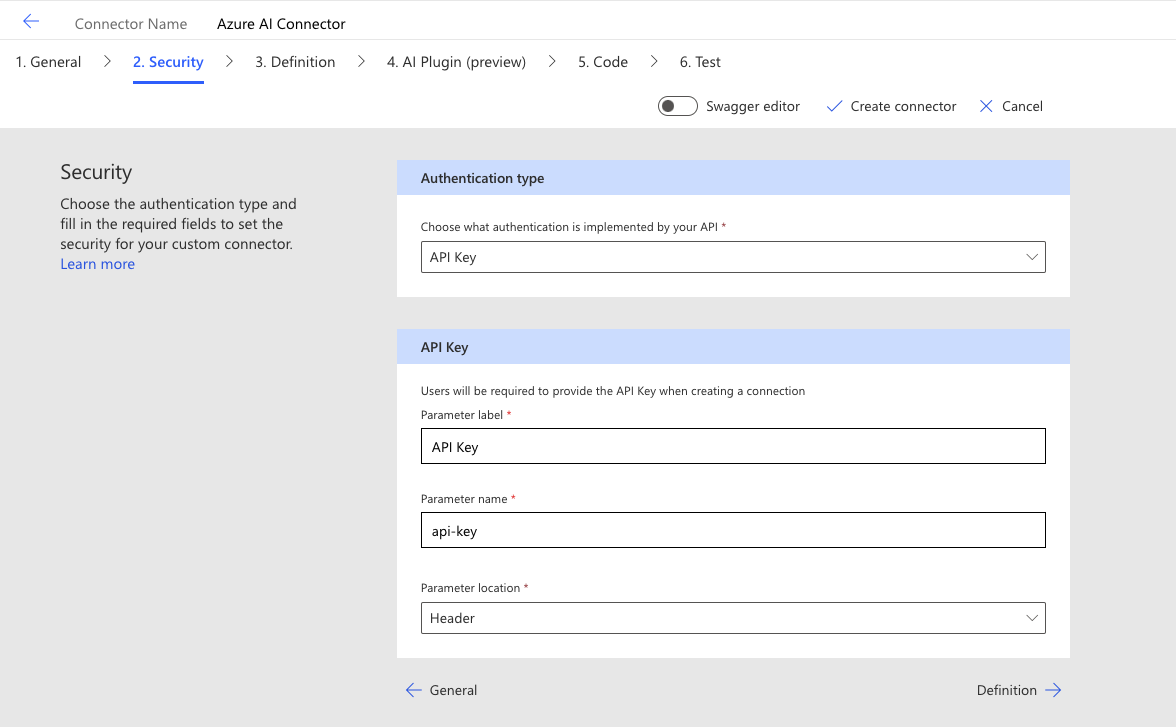
The next step is to create a security layer that allows us to authenticate the custom connector through a connection reference. Because we want to use the deployment API key, our authentication type will be API Key.
When prompting a model through an HTTP request, we authenticate the model through the header using the parameter api-key. We need to use the same naming convention to avoid any issues. For the API Key section, we can give our parameter a label name, but we need to ensure that the parameter name itself is set to api-key and is located in the header.
Definition
This is a fun part. Because we are keeping it simple for now and are pointing our base URL to the chat completion API, we don’t really need to create many definitions. We just need one for our connector to work. Add a new definition and give it a name, description, and ID.
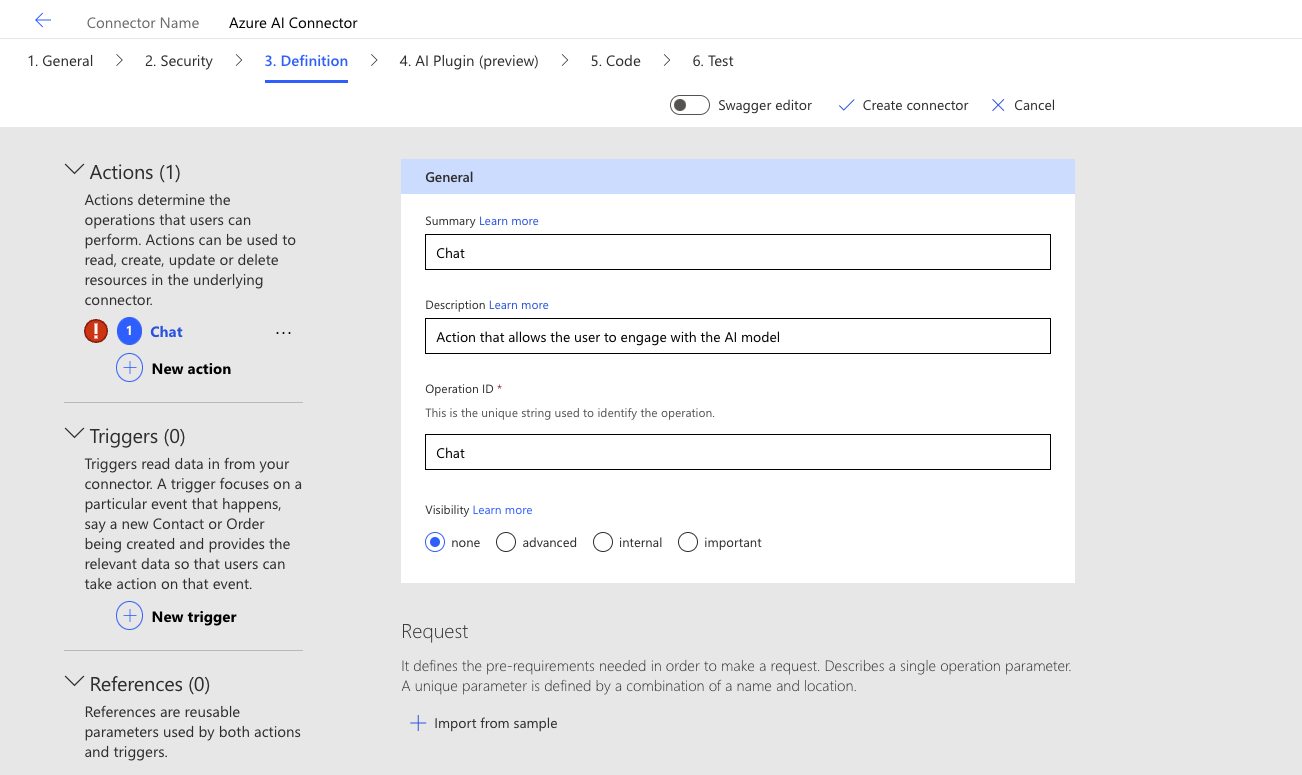
Next, we need to define the request body for the action. This is basically turning the standard HTTP request body into fields within the connector. If we select Import from sample, we can start completing the body through a template. At this point, we need to define the verb as Post, and we can actually past in the full AI deployment endpoint, including all the parameters. Because the endpoint includes the API version, you will see that after we create the sample, the body created the API version as a parameter field as well. Paste in the full endpoint, and I have used the below JSON as a sample for my connector.
{
    "messages": [
        {
            "role": "system",
            "content": "You are an AI assistant."
        },
        {
            "role": "user",
            "content": "Can you summarise this text?"
        }
    ],
    "temperature": 0.7,
    "max_tokens": 1000
}
I have also included the following in the Headers field: Content-Type application/json. Your sample should now look something like this:
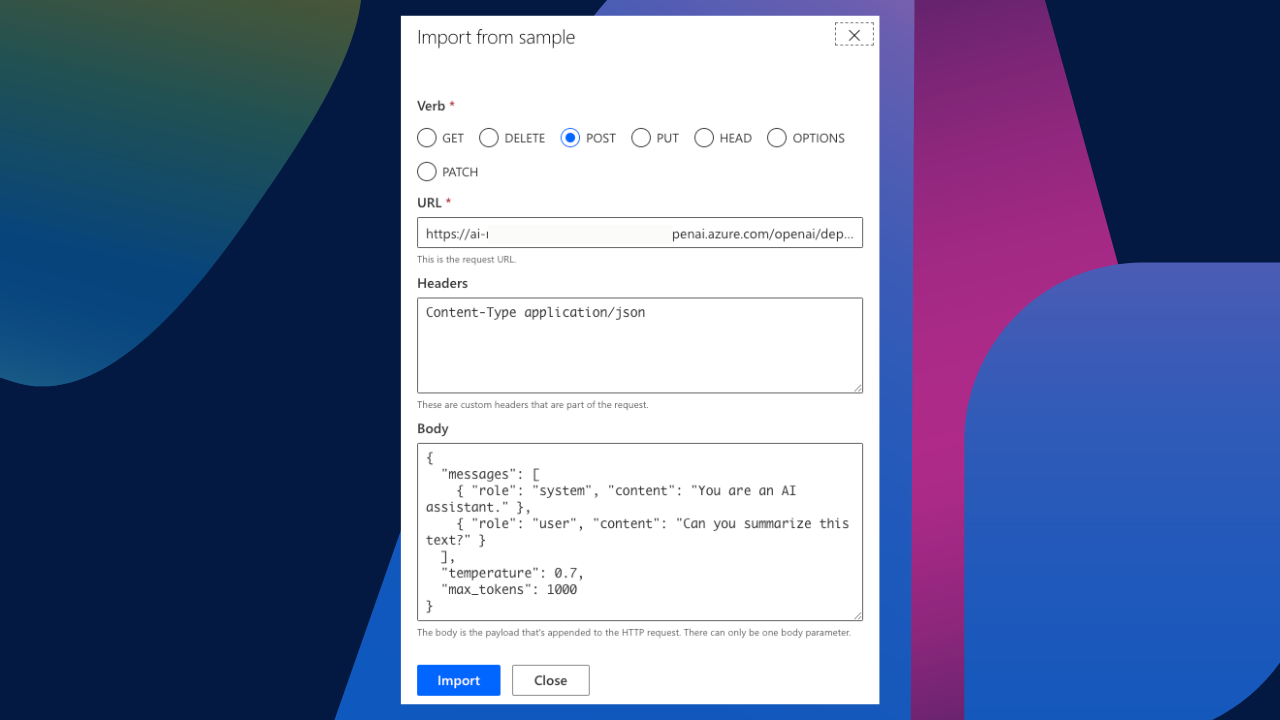
When we select import, our connector body will generate and should look something like this. Notice how the body included the api version as a query parameter and also added the Content-Type header option.
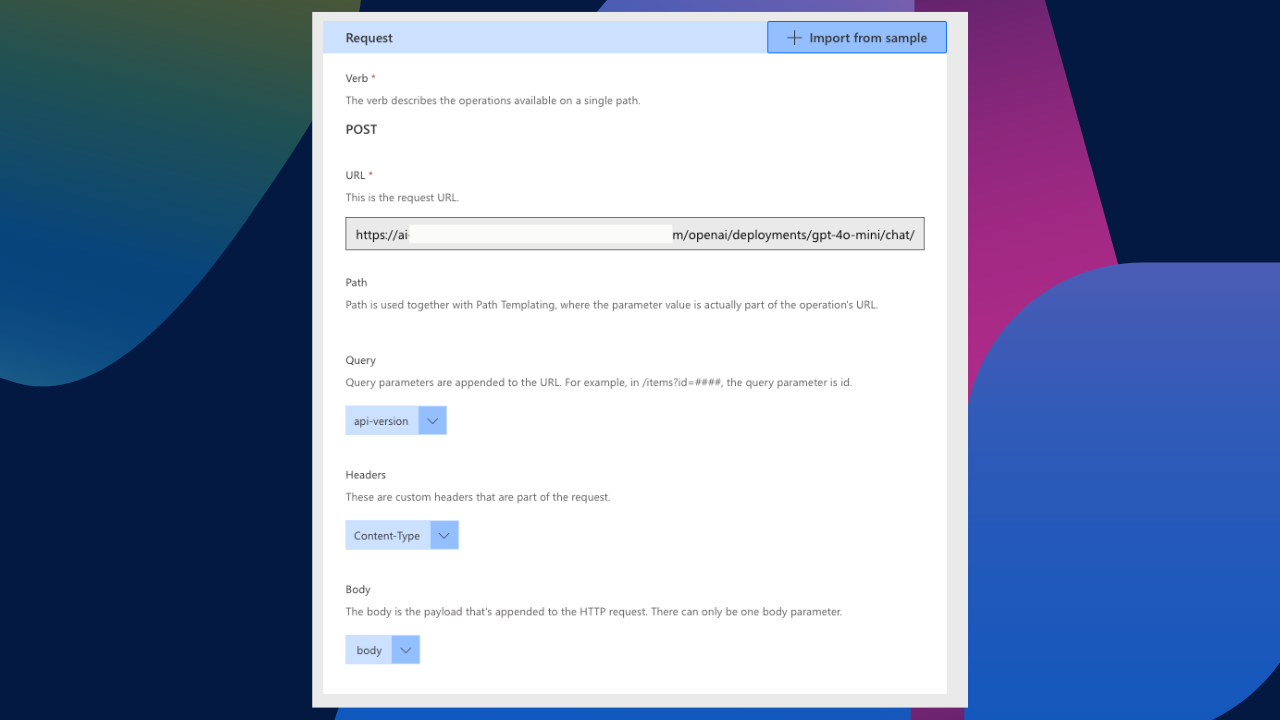
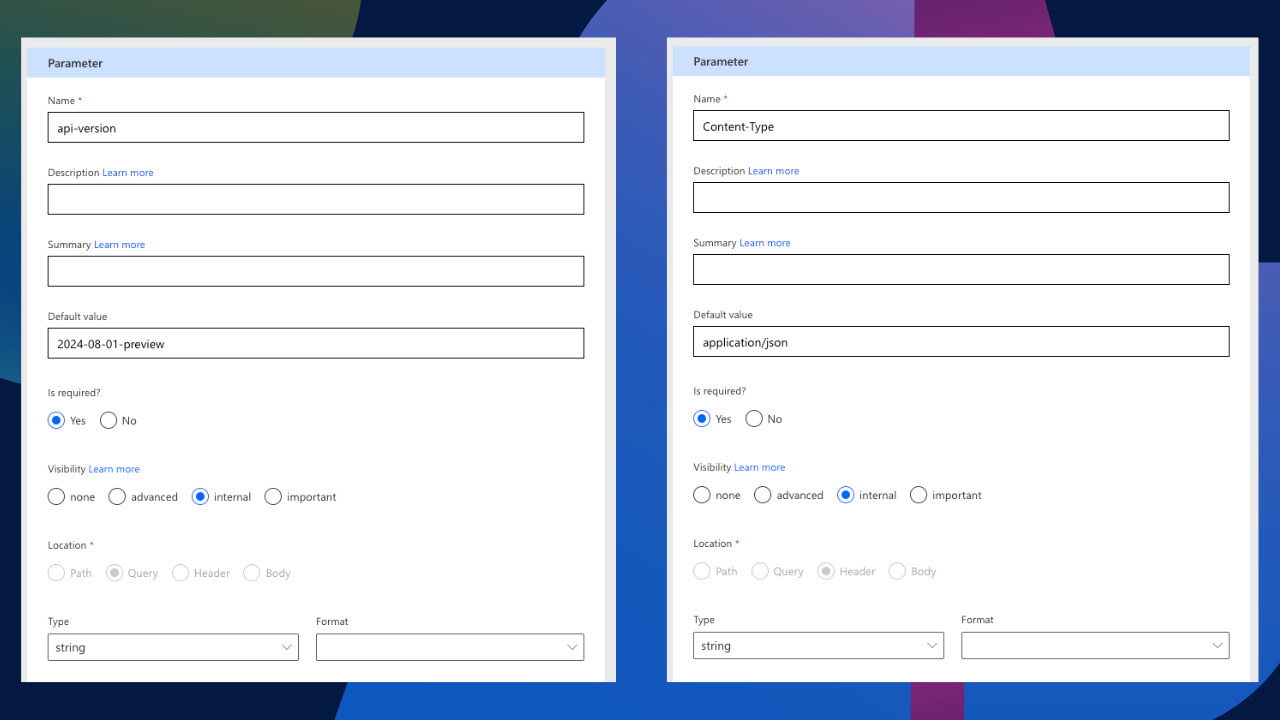
We want to make this connector as user-friendly as possible. For that reason, we are going to hide some of these requests. If we select the API version and edit it, I want to make it required but only visible internally. Therefore, I have also assigned it a default value. I have done the same for Content-Type. I have made it a required field, set its visibility to be internal, and provided a default value.
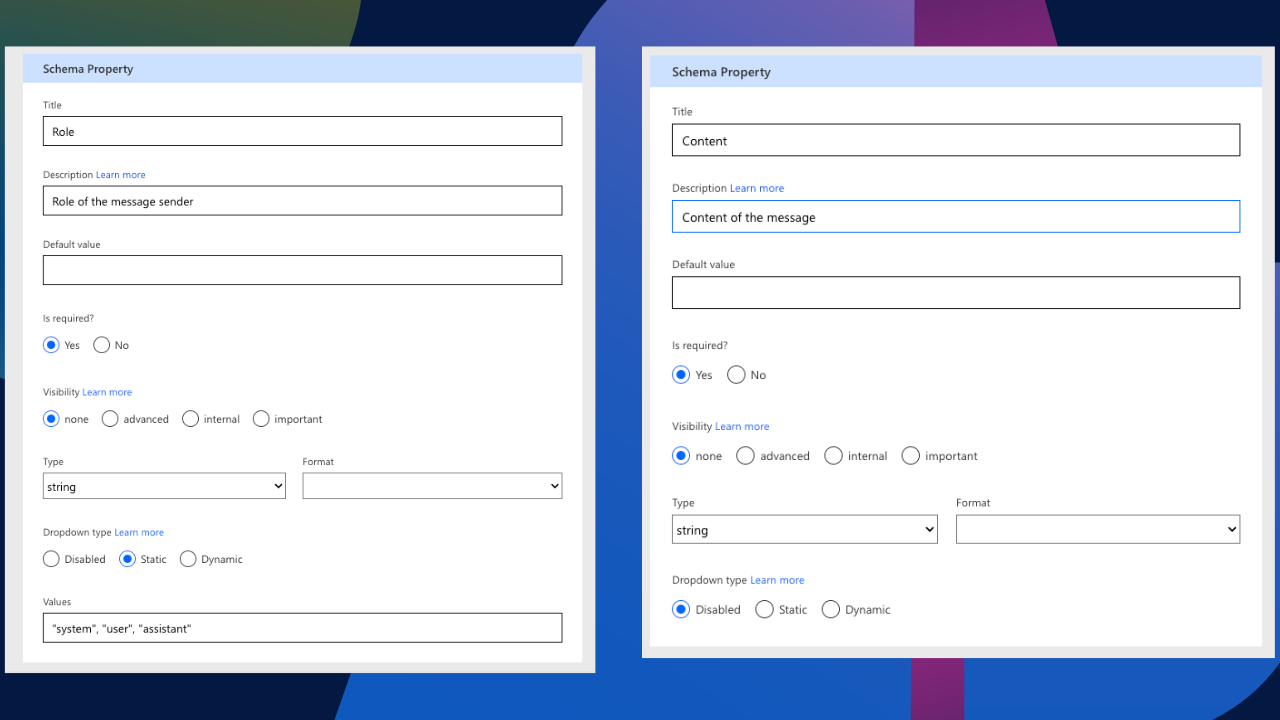
Next, we’re going to edit some of the body parameters. We currently have four parameters: max_tokens, content, role, and temperature. I’m OCD, so I like to rename these with proper formatting. Furthermore, we need to make the role and content parameter required. This then forces the user to input these parameters. For the role, however, I have made the dropdown type static with a pre-defined list of roles normally available when prompting. This is to avoid any potential incorrect roles being requested.
Finally, I have also used the following JSON to format the connectors response.
{
    "Message":
    {
        "Response": "AI generated"
    },
    "Usage":
    {
        "Completion Tokens": 22,
        "Prompt Tokens": 220,
        "Total Tokens": 242
    }
}
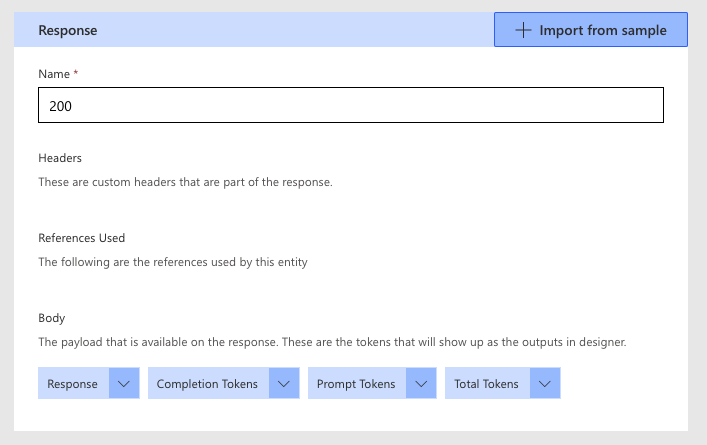
Under the Response section, we can also import sample JSON. Simply click on the response, Import from sample, and paste the above JSON in. The response body will now look something like this:
Swagger
One thing I really want to incorporate into the connector is the ability to have a variety of message roles the end user can interact with. In our current configuration, if we deploy this connector, the user will only be able to select a single role and input a single piece of content. We want the user to define a system role with content as well as a user role with content. This therefore requires an x-ms-dynamic competent to allow for multiple parameters in the same body. To achieve this, we need to update the Swagger directly (the only way I know how). To view the connectors swagger, simply switch the toggle at the top of the connectors edit screen to the swagger editor, which basically allows you to view the connector in YAML.
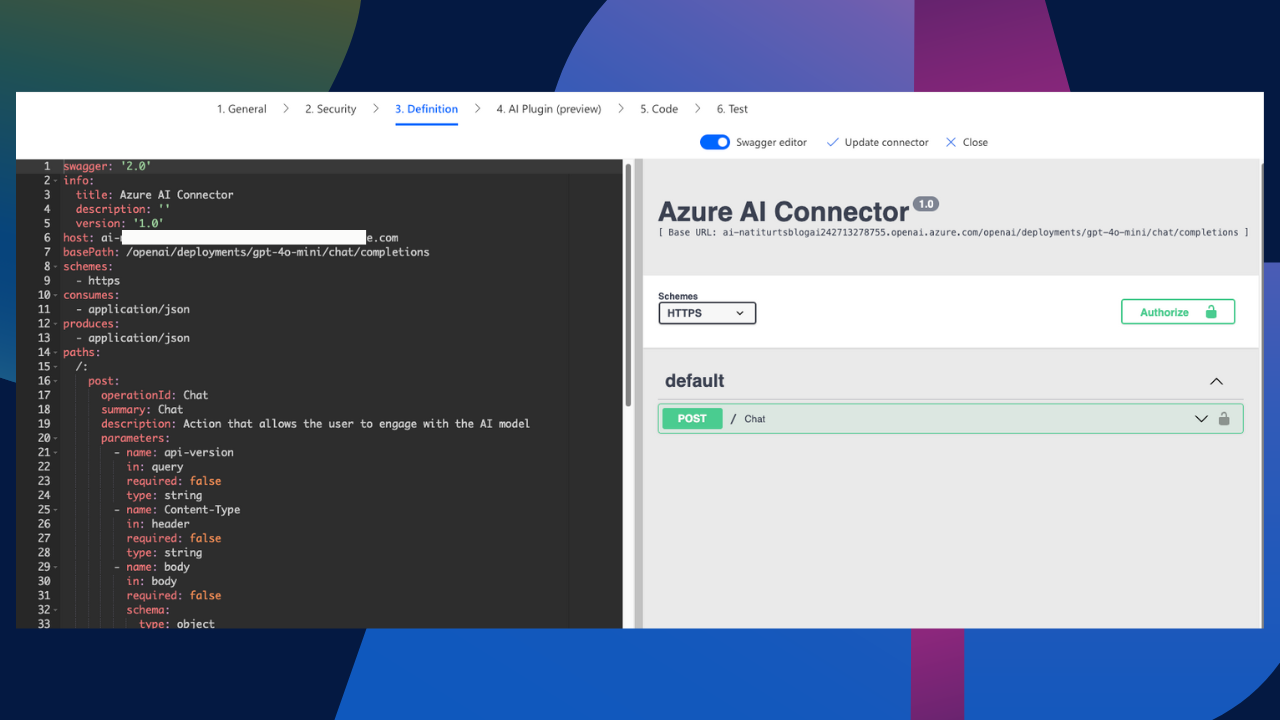
With a lot of help from ChatGPT, I asked AI to assist with incorporating an x-ms-dynamic competent into my parameters and generate me updated YAML. It successfully did that, so here is the YAML you can simply paste into the Swagger Editor:
swagger: '2.0'
info:
  title: Azure AI Connector
  description: ''
  version: '1.0'
host: ai-natiturtsblogai242713278755.openai.azure.com
basePath: /openai/deployments/gpt-4o-mini/chat/completions
schemes:
  - https
consumes:
  - application/json
produces:
  - application/json
paths:
  /:
    post:
      operationId: Chat
      summary: Chat
      description: Action that allows the user to engage with the AI model
      parameters:
        - name: api-version
          in: query
          required: true
          type: string
          default: 2023-06-01-preview
          description: The API version to use for this operation
          x-ms-visibility: internal
        - name: Content-Type
          in: header
          required: true
          type: string
          default: application/json
          description: Indicates the media type of the resource
          x-ms-visibility: internal
        - name: body
          in: body
          required: true
          schema:
            type: object
            properties:
              messages:
                type: array
                items:
                  type: object
                  properties:
                    role:
                      type: string
                      description: Role of the message sender
                      enum:
                        - system
                        - user
                        - assistant
                      x-ms-enum:
                        name: Role
                        values:
                          - value: system
                            displayName: System
                          - value: user
                            displayName: User
                          - value: assistant
                            displayName: Assistant
                      title: Role
                    content:
                      type: string
                      description: Content of the message
                      title: Content
                  required:
                    - role
                    - content
                description: List of message objects
              temperature:
                type: number
                format: float
                description: Controls randomness of the response
                title: Temperature
                default: 0.1
              max_tokens:
                type: integer
                format: int32
                description: Maximum number of tokens to generate
                title: Max Tokens
                default: 1000
            required:
              - messages
      responses:
        '200':
          description: Successful operation
          schema:
            type: object
            properties:
              Message:
                type: object
                properties:
                  Response:
                    type: string
                    description: Response
                    title: Response
                description: Message
              Usage:
                type: object
                properties:
                  Completion Tokens:
                    type: integer
                    format: int32
                    description: Completion Tokens
                    title: Completion Tokens
                  Prompt Tokens:
                    type: integer
                    format: int32
                    description: Prompt Tokens
                    title: Prompt Tokens
                  Total Tokens:
                    type: integer
                    format: int32
                    description: Total Tokens
                    title: Total Tokens
                description: Usage
      consumes:
        - application/json
      produces:
        - application/json
securityDefinitions:
  API Key:
    type: apiKey
    in: header
    name: api-key
security:
  - API Key: []
tags: []
Test
Before we can test the connector out, we need to update it first. Select the Update connector at the top and wait for the success message. Once we have saved the connector, we can do a quick test in the connector itself, then take it to Power Automate.
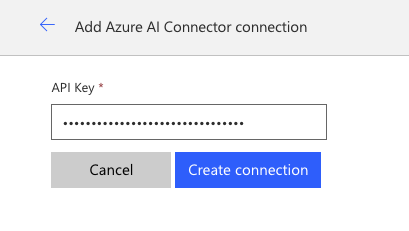
Within the Test section, we will need to initiate a new connection for the connector to use. Select New Connection. We should be redirected to a new screen. On this screen, we will be prompted to provide the AI deployment API key. If we do this and select Create connection, we will be redirected back to our connector, and we just need to refresh. Finally, select the connection from the dropdown.
In the Operations area, we can see that the API version and Content-Type are already pre-populated. We just need to input a role and some content. Because we are testing directly within the connector, we won’t have that dynamic form to have multiple roles just yet. We simply want to validate our query works here. Input a role and some content and test the operation.
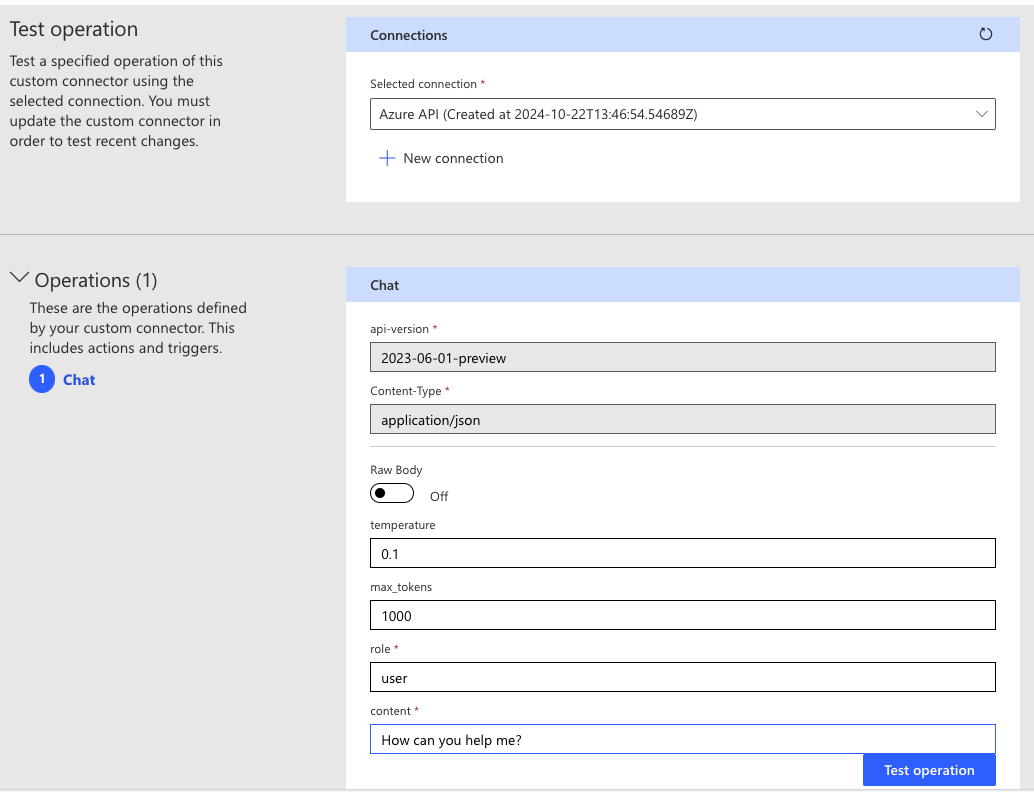
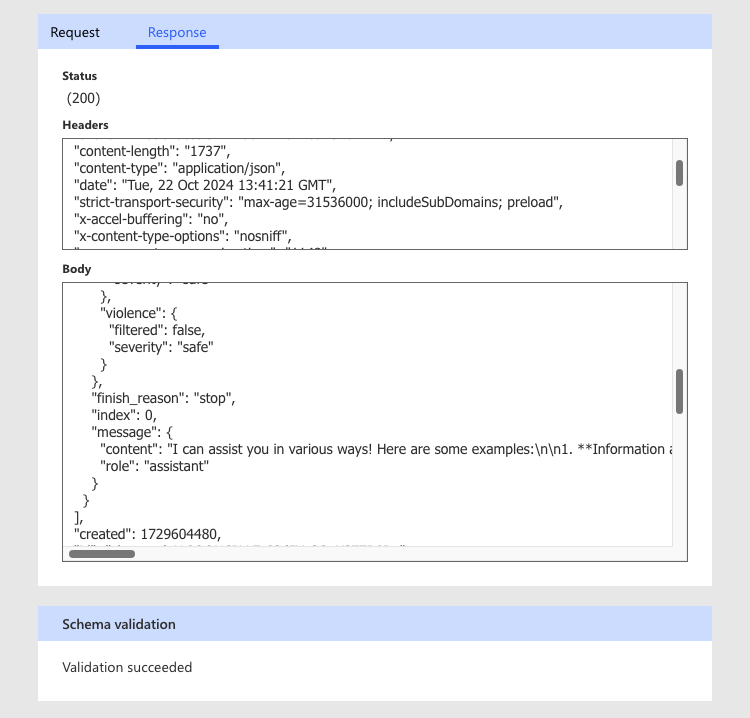
We should receive a nice, pretty green tick next to the operation, and if we scroll down, we can see the output response from the prompt. Our connector works!
Custom Connector in Power Automate
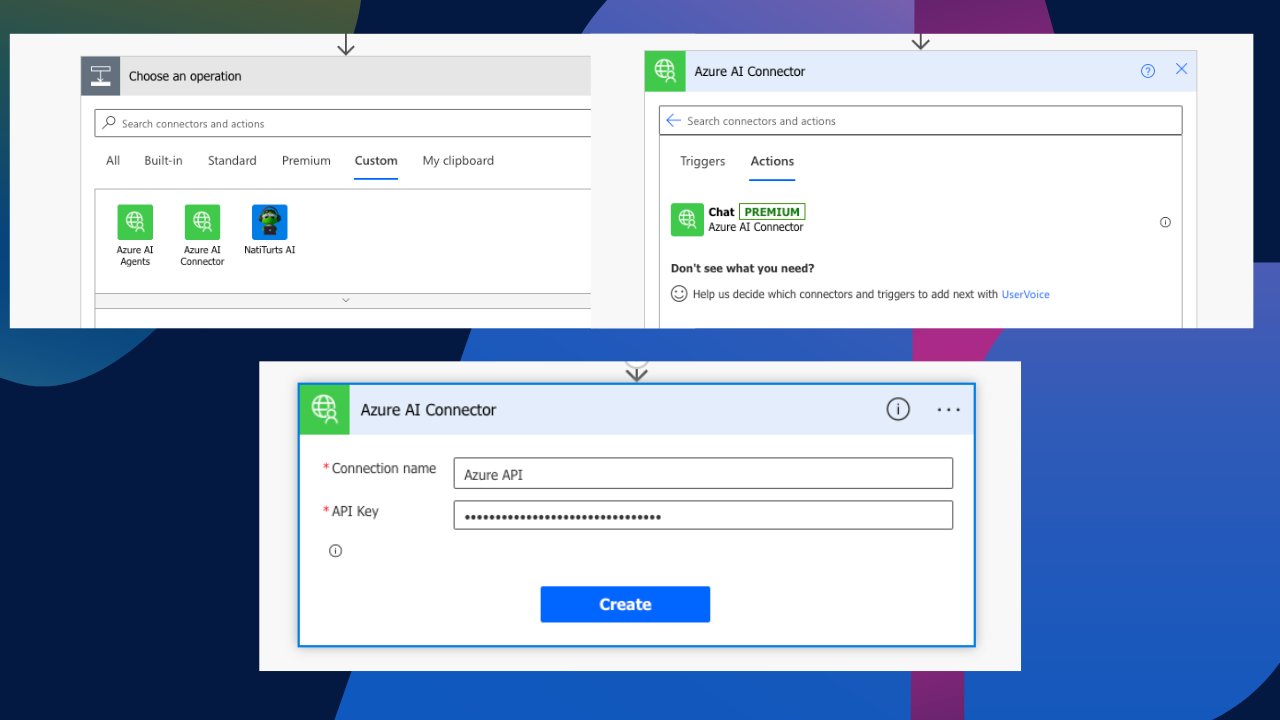
In Power Automate, we will add new custom action. You can see that our Azure AI connector is sitting right there. If we select it, we should see our Chat definition. The connector has already been authenticated from our previous test, but if we deleted that connection reference to test this properly, we would have first seen a request to create a connection with the API Key.
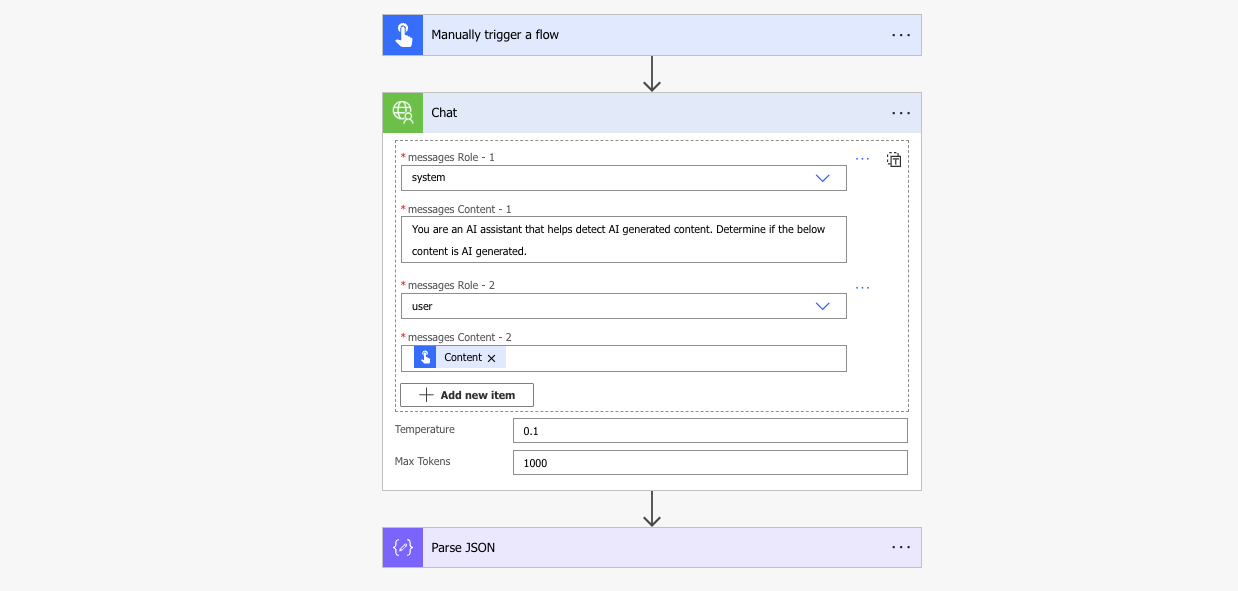
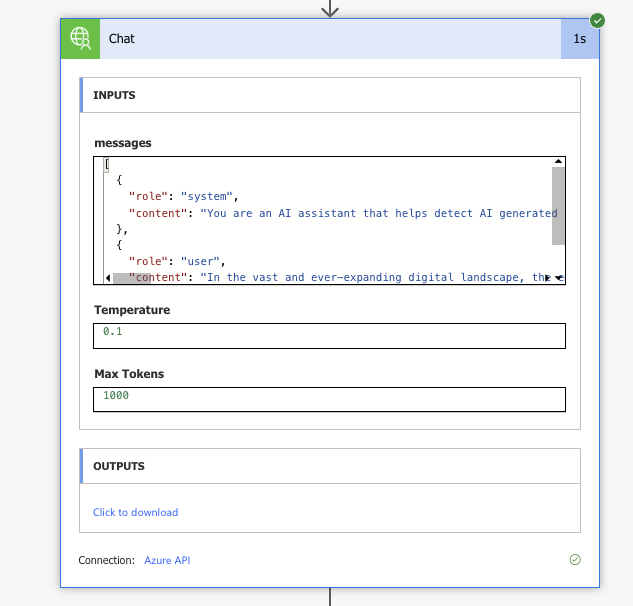
I have completed all the connector inputs and have added both a system and user role with messages. I am planning to test this with some AI-generated content and am asking the model to determine if the content is AI-generated. My action now looks something like this (note how we don’t have any API keys visible!).
And the flow ran successfully, returning no visible API keys and a full response from the model.
{
  "choices": [
    {
      "content_filter_results": {
        "hate": {
          "filtered": false,
          "severity": "safe"
        },
        "protected_material_code": {
          "filtered": false,
          "detected": false
        },
        "protected_material_text": {
          "filtered": false,
          "detected": false
        },
        "self_harm": {
          "filtered": false,
          "severity": "safe"
        },
        "sexual": {
          "filtered": false,
          "severity": "safe"
        },
        "violence": {
          "filtered": false,
          "severity": "safe"
        }
      },
      "finish_reason": "stop",
      "index": 0,
      "message": {
        "content": "The content provided exhibits characteristics commonly associated with AI-generated text. It features:\n\n1. **Formal Tone**: The language is formal and somewhat abstract, which is typical of AI-generated content.\n2. **Generalizations**: The statements are broad and lack specific examples or details, a common trait in AI writing.\n3. **Complex Sentence Structure**: The sentences are complex and lengthy, which can be indicative of AI-generated text aiming for sophistication.\n4. **Lack of Personal Insight**: The content does not reflect personal experiences or insights, which is often absent in AI-generated material.\n\nWhile it is possible for a human to write in this style, the combination of these elements suggests that the text is likely AI-generated.",
        "role": "assistant"
      }
    }
  ],
  "created": 1729606350,
  "id": "chatcmpl-AL9uY4MtBI5aWqW67b2EuYZJa0NNQ",
  "model": "gpt-4o-mini",
  "object": "chat.completion",
  "prompt_filter_results": [
    {
      "prompt_index": 0,
      "content_filter_results": {
        "hate": {
          "filtered": false,
          "severity": "safe"
        },
        "jailbreak": {
          "filtered": false,
          "detected": false
        },
        "self_harm": {
          "filtered": false,
          "severity": "safe"
        },
        "sexual": {
          "filtered": false,
          "severity": "safe"
        },
        "violence": {
          "filtered": false,
          "severity": "safe"
        }
      }
    }
  ],
  "system_fingerprint": "fp_878413d04d",
  "usage": {
    "completion_tokens": 146,
    "prompt_tokens": 150,
    "total_tokens": 296
  }
}
Conclusion
This method, in comparison to the Azure Key Vault method I tried in my other blog post, is definitely my preferred approach, and you can clearly see the additional governance we have now included to ensure the API key stays locked up without it leaking in the flow run history.
In my parallel post to STOP EXPOSED API KEYS IN HEADERS, we are going to explore an alternative route. Check it out here: Secure Your APIs with Azure Key Vault.
Until then, I hope you enjoyed this post and found it insightful. If you did, feel free to buy me a coffee to help support me and my blog. Buy me a coffee.



This Article is pure gold