STOP EXPOSED API KEYS IN HEADERS!!!
This is a two-part post, the reason being that I experimented with two different approaches to solve a problem. One works much better than the other, but both are good practices when using API keys. For that reason, this post, Secure Your APIs with Azure Key Vault, has the same intro and problem statement as my blog, Build a Secure Azure AI Custom Connector.
I’ve now written two blog posts about leveraging AI models through HTTP requests within Power Automate. I looked at prompting the OpenAI model as well as a personal Azure AI deployment. Similar to various other posts out there, the basic and conventional route to introduce this type of concept, whether you’re using Azure AI, OpenAI, or any other endpoint for that matter, is to include your API key within your HTTP request header.
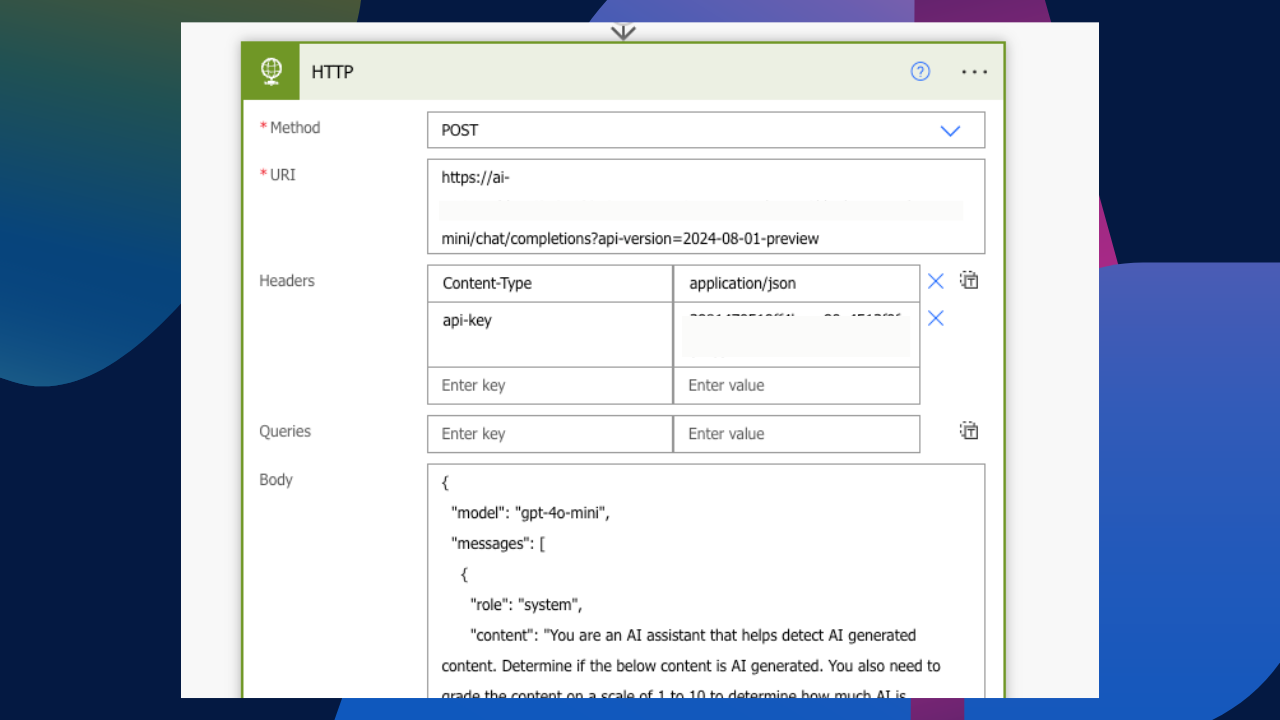
As an introductory post on how one can leverage those services within Power Platform, I’d say it’s a great start. But let’s not use this method as a viable option for solution architecture and development. Authentication within headers is not a permanent resolution. It is incredibly insecure, and anyone with access to the flow would therefore have access to the API Key as well.
In today’s post, we’re diving into the first of my approaches to managing keys and authentication outside a header. Let’s get started.
The Problem
As mentioned earlier, adding an API to an HTTP header is great for testing endpoints and authentications; it’s basically a step further from using Postman. But having this as a production running flow is really not ideal. Seriously, does the below look safe?
Azure Key Vault
One of the two solutions I am exploring today is Azure Key Vault. Azure Key Vault is a secure Azure cloud service that allows us to store various keys in a designated vault. Keys can range from secrets to keys and certificates. The beauty about using a vault is that it centralises multiple credentials or access tokens into appropriate resources securely. This means that if you ever need to reuse a secret, you have a single repository to access them directly through the connector within Power Automate or Power Apps. Furthermore, Azure Key Vault offers various other security layers on your keys to help protect them as much as possible. A common one I use is the activation date and expiration date.
By now, hopefully you’ve realised I am exploring the Azure ecosystem and the extensibility between Power Platform and Azure, so it goes without saying, you need an active Azure subscription. The cost, however, for an Azure Key Vault is really minimum. For the standard pricing tier, you’re looking at a cost of £0.023 per 10,000 transactions. Let’s proceed with creating a new vault.
Creating a Key Vault
It is always ideal to use appropriate resource groups to hold specific Azure resources per project. I already spun up an AI Blog resource group a while back, so that’s what I’ll be using today. If I search for Key Vault in Azure, it should show up as a little key in a circle. Simply select this service and click Create. We will need to provide our Azure subscription, resource group, and fill in some further information.
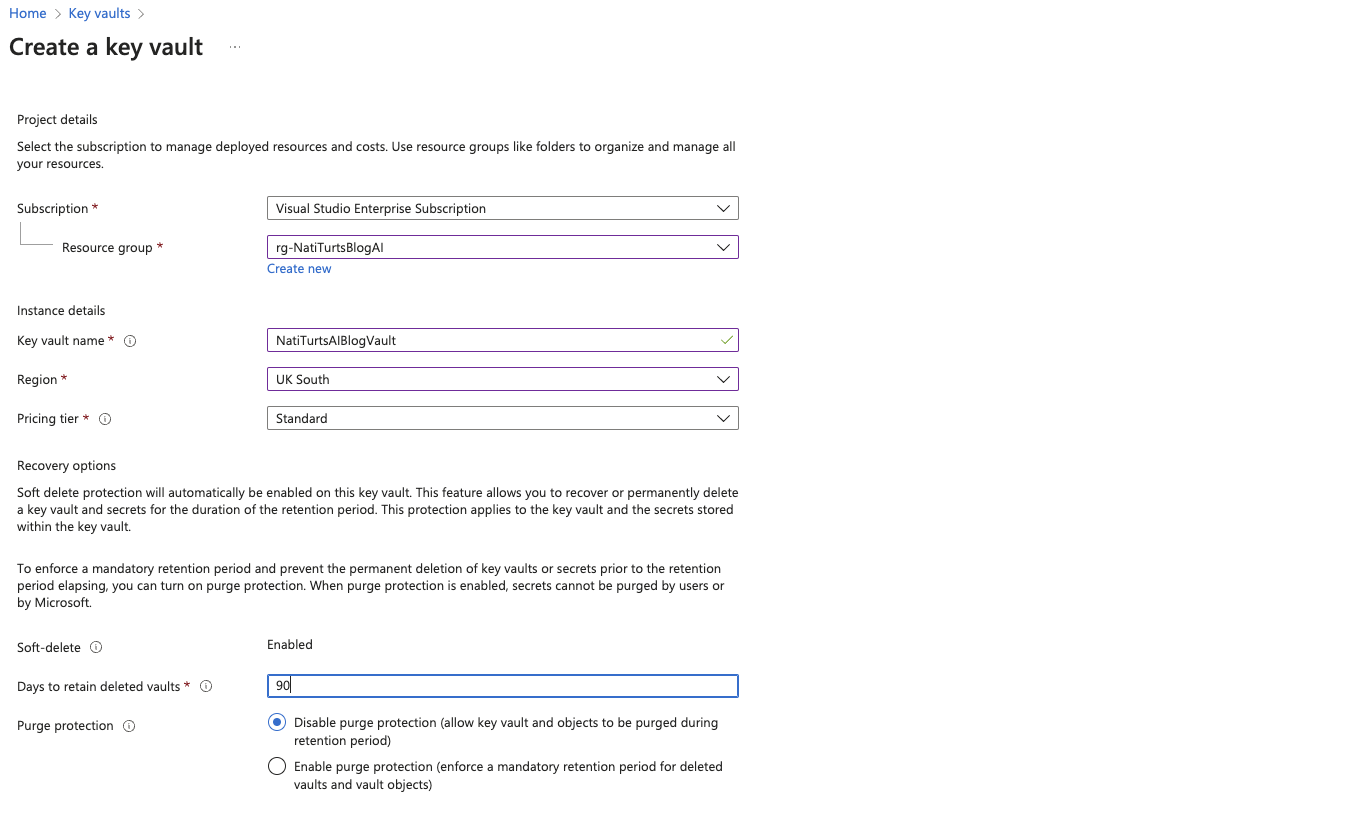
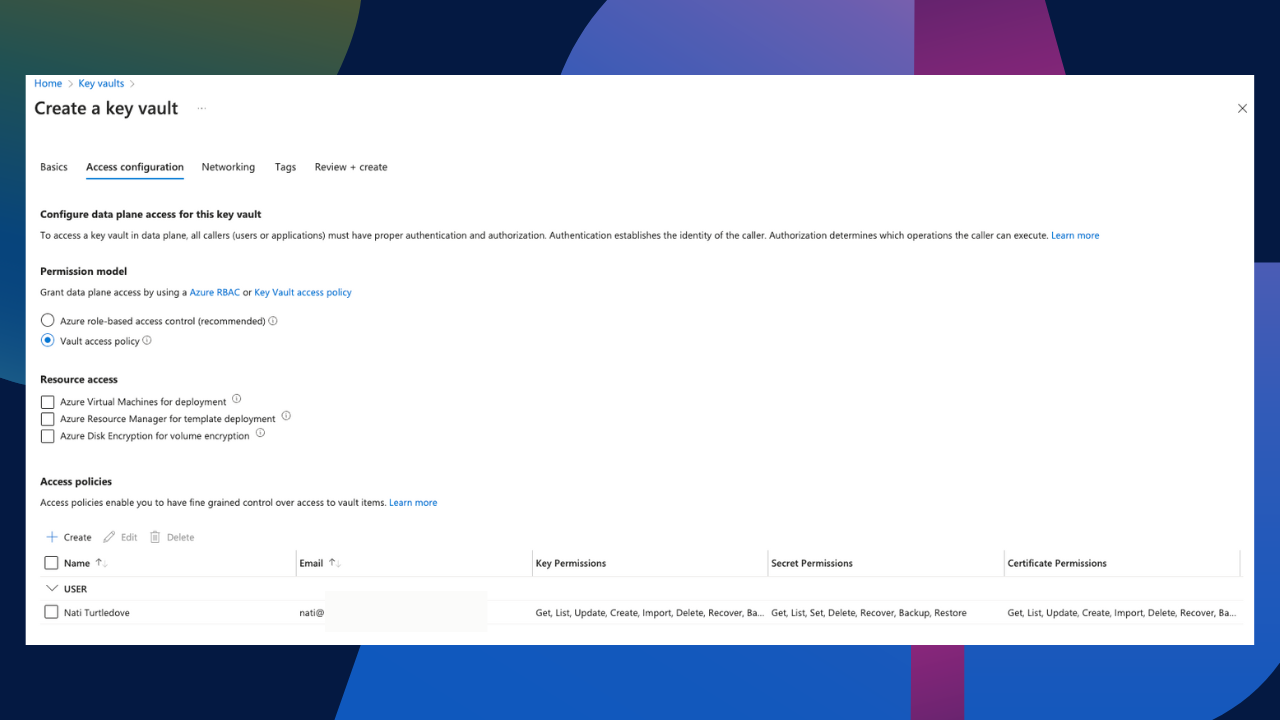
Once we have completed this general part of this form, we can click on next. At this point, we will need to set the security permissions for the vault. We can either use the standard Azure RBAC model or we can configure custom permissions as per your needs. This grants users access to the vault to view, create, manage keys, etc. It also determines where this resource can be used. Keep in mind that if you do decide to use the recommended Azure RBAC model, it may take an extra few minutes after the resource has provisioned to inherit the permissions. Worst case, you can update the roles manually to speed things up.
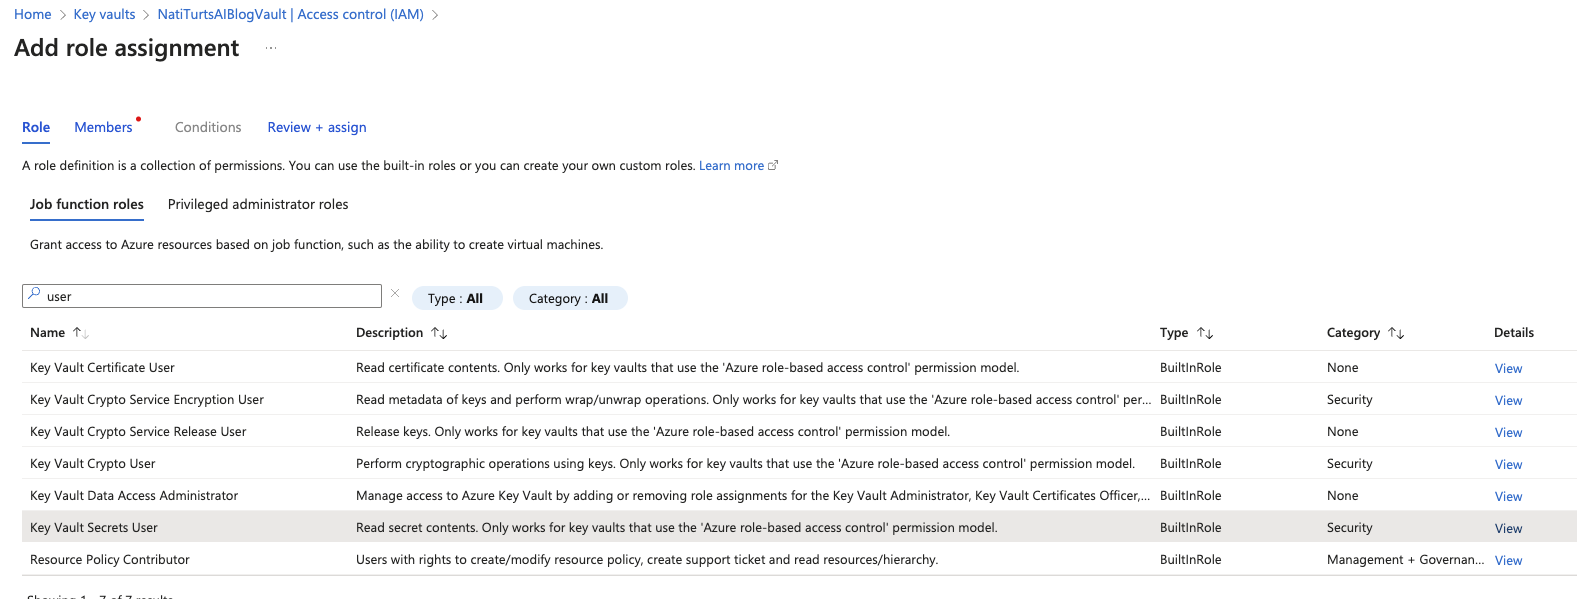
Before we proceed to adding a key, let’s quickly update a role assignment in the Key Vault. This will make sense a bit later on. Within the Key Vault under Access Control (IAM), let’s add a new role assignment. Within the Job Function Roles section, we need to search for the Key Vault Secrets User role. Let’s select the role and over to members.
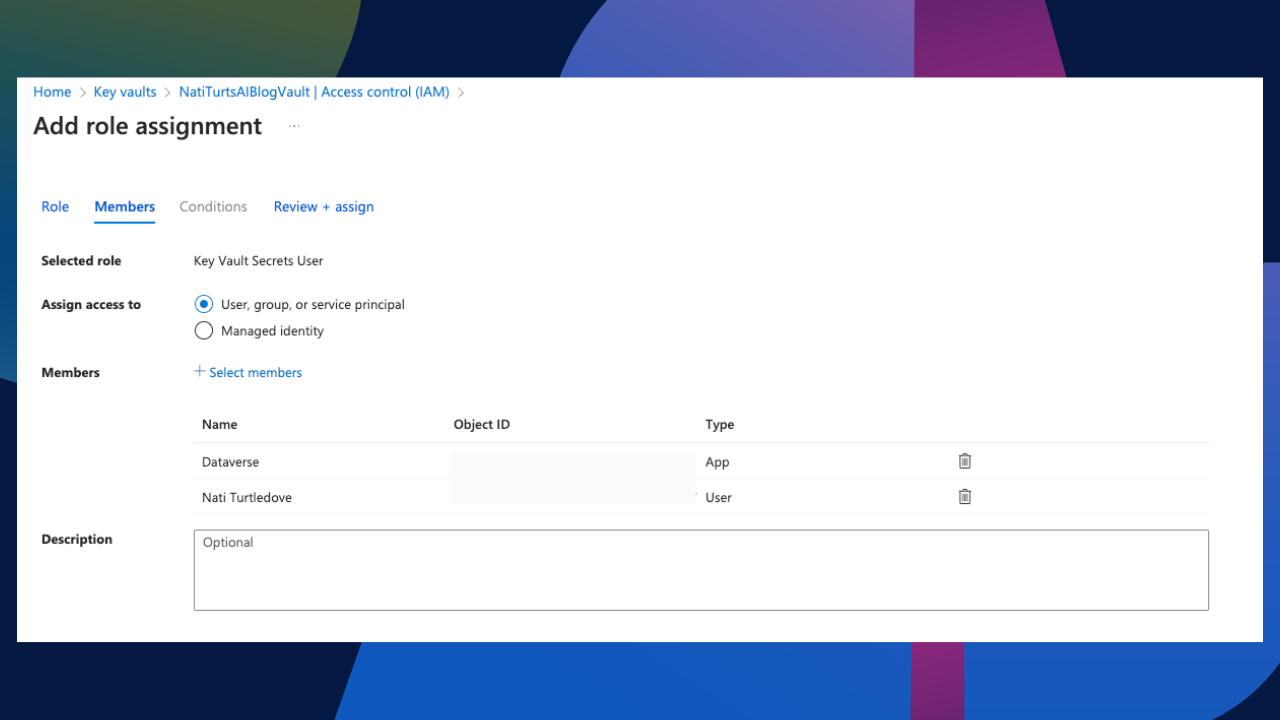
Within the Members section, add a designated user. This can be yourself, another user, or a service account. Later on, we are going to be creating a secret as an environment variable, so be sure to add the user that will be creating that variable. We also need to add the Dataverse service principle. This can be done by simply adding the Dataverse Application as a member as well. Once we have added the users, click on Review + assign, and we can finally proceed.
Adding a Key to the Vault
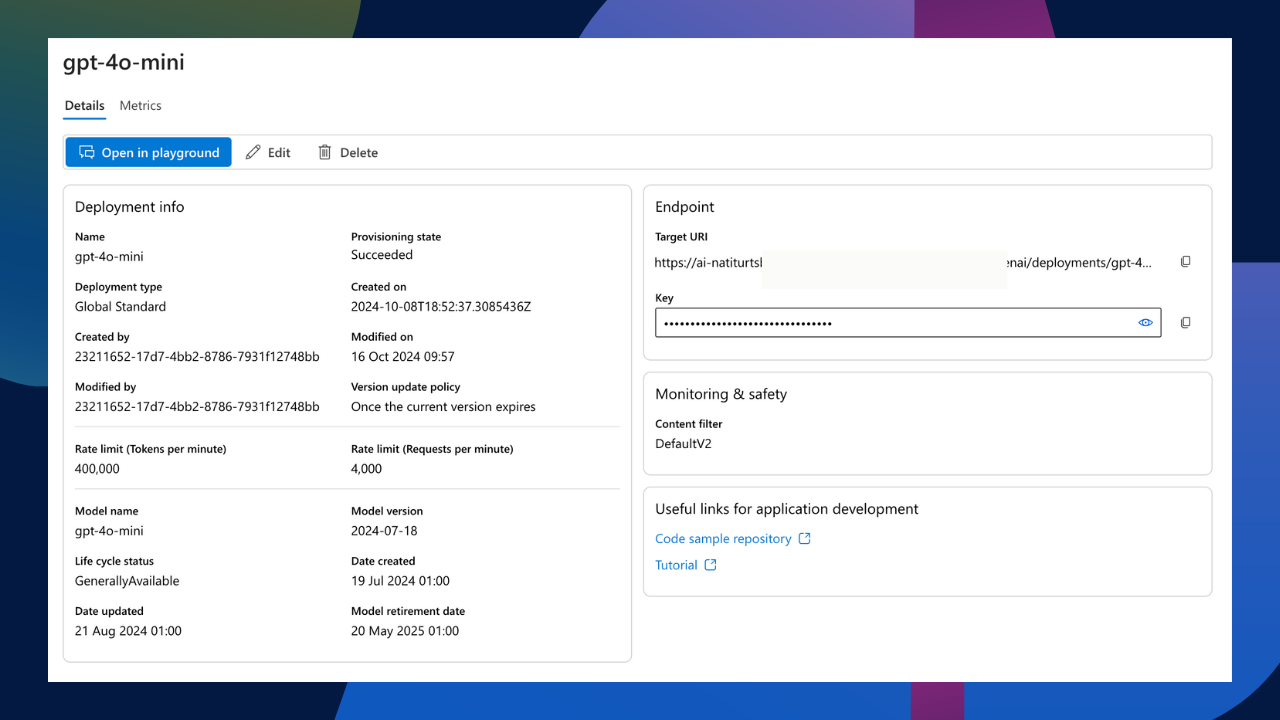
Now that we have a running vault, it’s time to add the API key. For today’s post, I am using the same flow I used in my previous post, where I prompted my Azure AI model. However, the only minor change is I am using a gpt-4o-mini model instead of the gpt-3.5-turbo. This means that my endpoint and API key have changed. All we need to do is head back over to Azure AI Studio, select our deployment, and copy the API key.
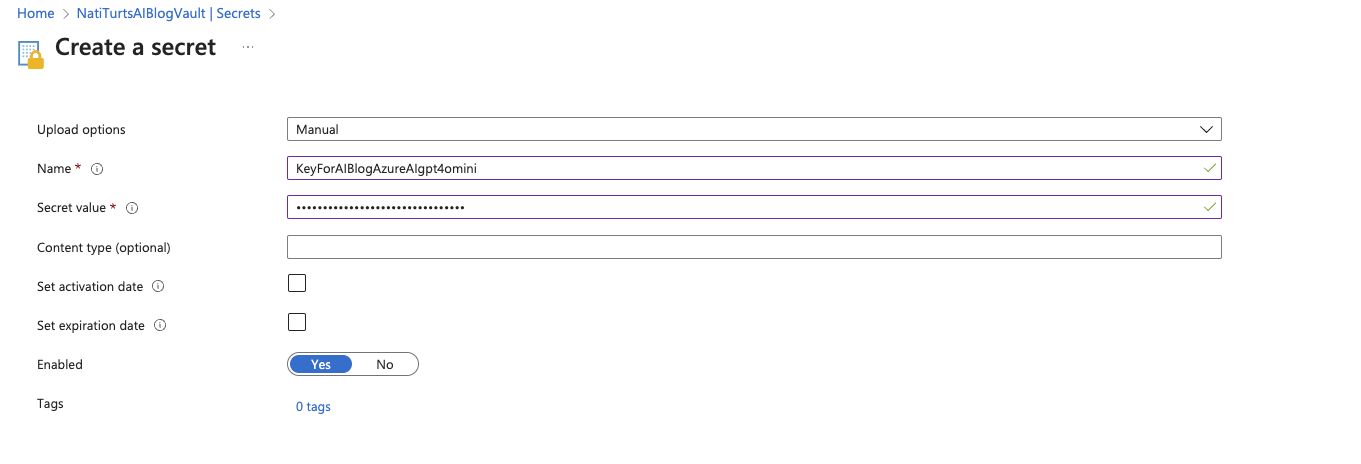
Once we have the key for our deployment, we can create a new secret in our Key Vault. Within the vault, simply select Objects > Secrets to the left of our vault and select Generate/Import. Give our key a name and paste the deployments key in the secret value field. You can also set an activation and expiration date if you like, but I am keeping it simple for now.
Key Vault in Power Automate
We now have the deployment key securely stored within an Azure Key Vault. The next step would be to call this secret in a flow so we can use it in the HTTP request.
Azure Key Vault Connector
Within Power Automate, I am going to create a new action using the Azure Key Vault connector. I want to use the Get Secret action as I created the key in the vault as a secret. To initiate a successful connection reference, we need to provide the authentication type and the name of the Key Vault where the secret is stored. For today’s blog, I am using simple Entra ID authentication and have captured the designated Key Vault name.
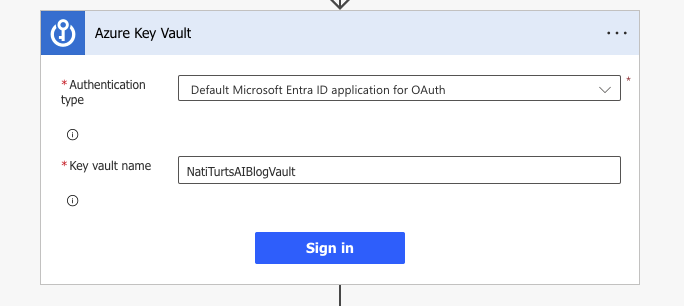
When the connection reference initiates, we will be able to select which secret we wish to use. In the dropdown, I am selecting the secret.

In our HTTP request, instead of using a hard-coded API key in the header, we can now replace that with the output value from the Get secret action.

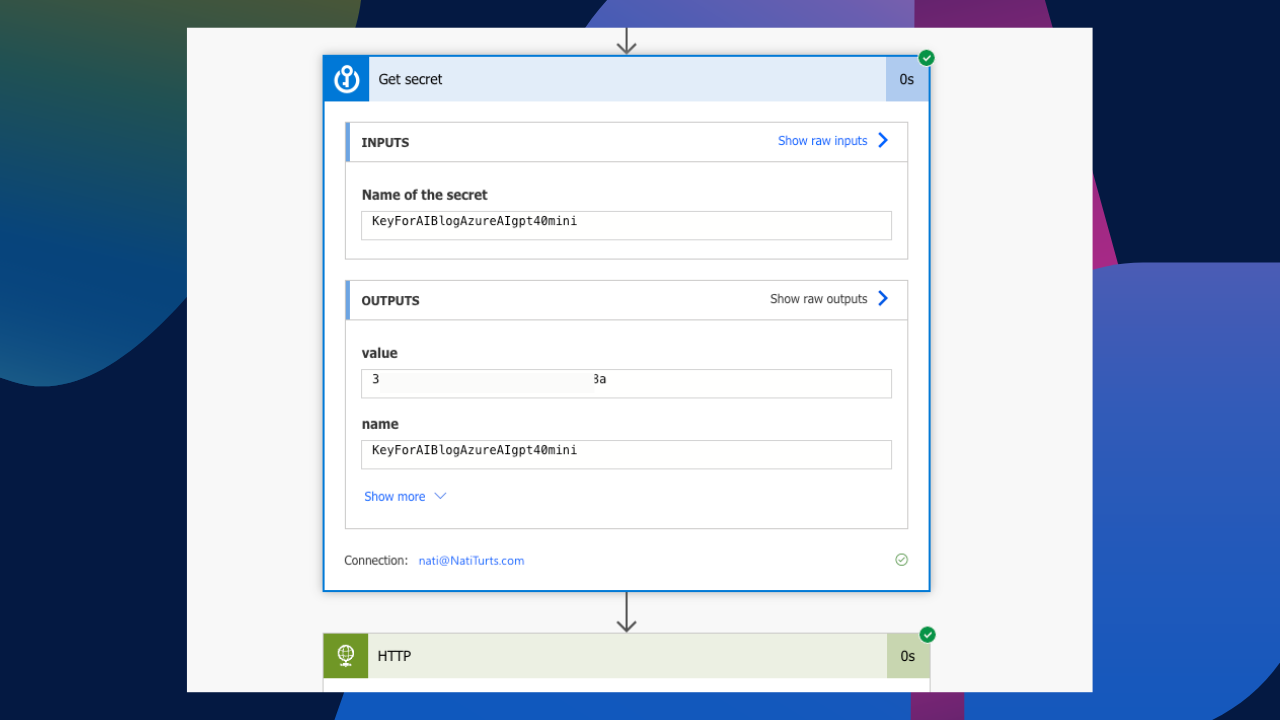
If we now run the flow, it should run successfully. We should also be able to see how the Get secret action retrieves the secret from the vault and passes it to the HTTP request.
The Solution Way
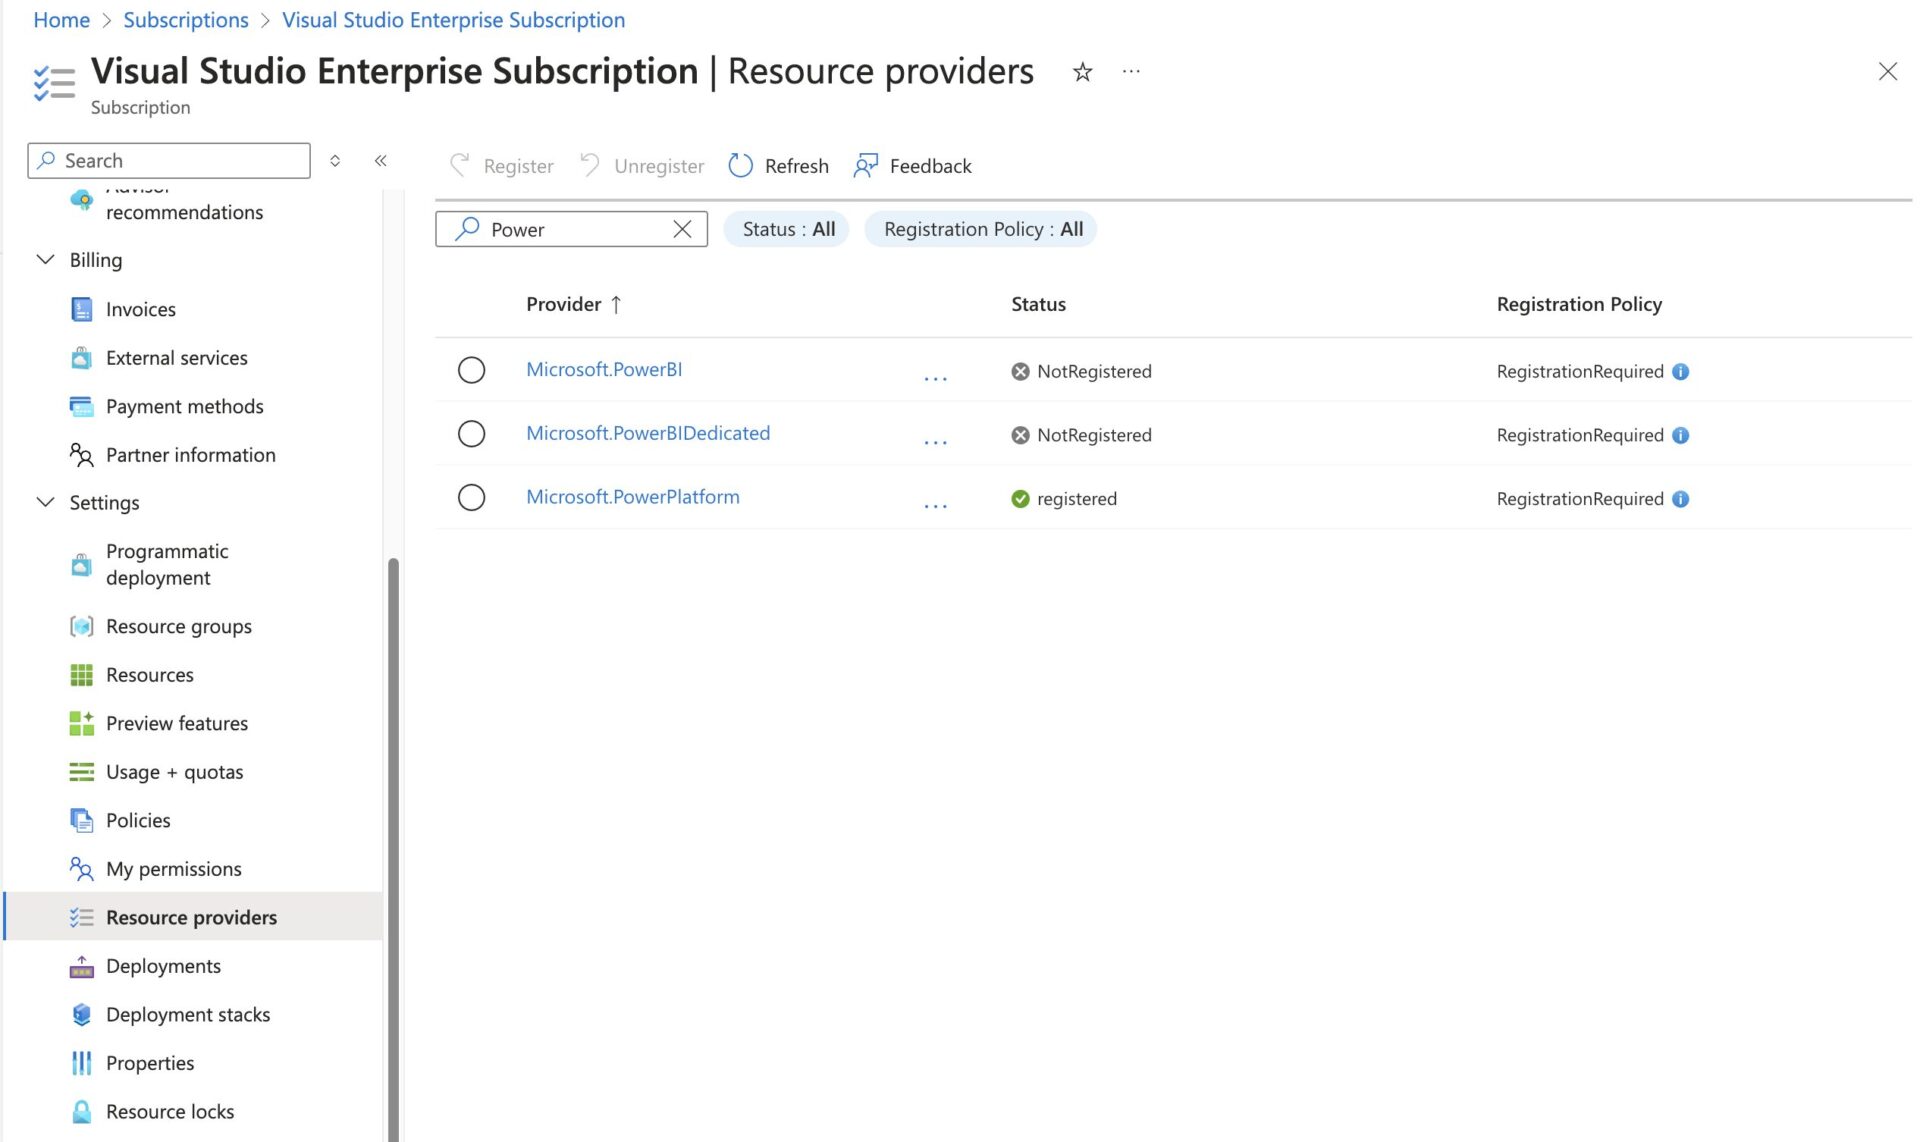
Now, of course, this is not the only way to get a secret from a Key Vault into a flow. We can actually create an environment variable within a solution that connects to the Key Vault and secret and then use that in our flow. Before we can create a secret environment variable, we just need to ensure that the Microsoft.PowerPlatform privilege is registered for the Azure subscription where the vault resides. This allows Power Platform resources to make use of the subscription resources.
To ensure Microsoft.PowerPlatform is registered, simply head over to Azure, select Subscriptions, select your subscription, and select Resource providers in the left pane under Settings. If you search for Power Platform, the Microsoft.PowerPlatform provider should be visible, and you should be able to see if it is registered or not. If it is not, simply select the provider and click on Register above.
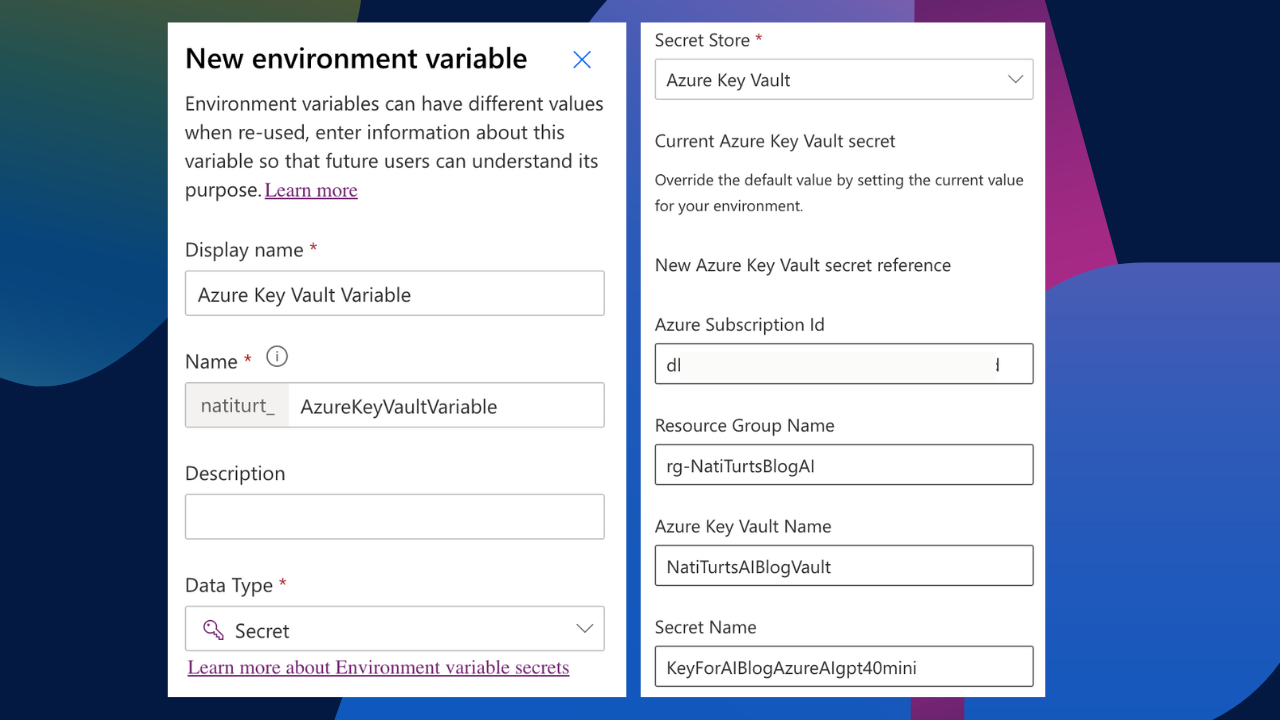
When creating the environment variable, give it a name following best naming convention and select Secret as the Data type. For now, let’s use a current value. To initiate a connection to the key vault, we need four pieces of information. We need our Azure subscription ID, the resource group name the vault resides in, the Key Vault name, and lastly, the name of the secret. Paste this all into the current value and save.
Retrieving the Key in Power Automate
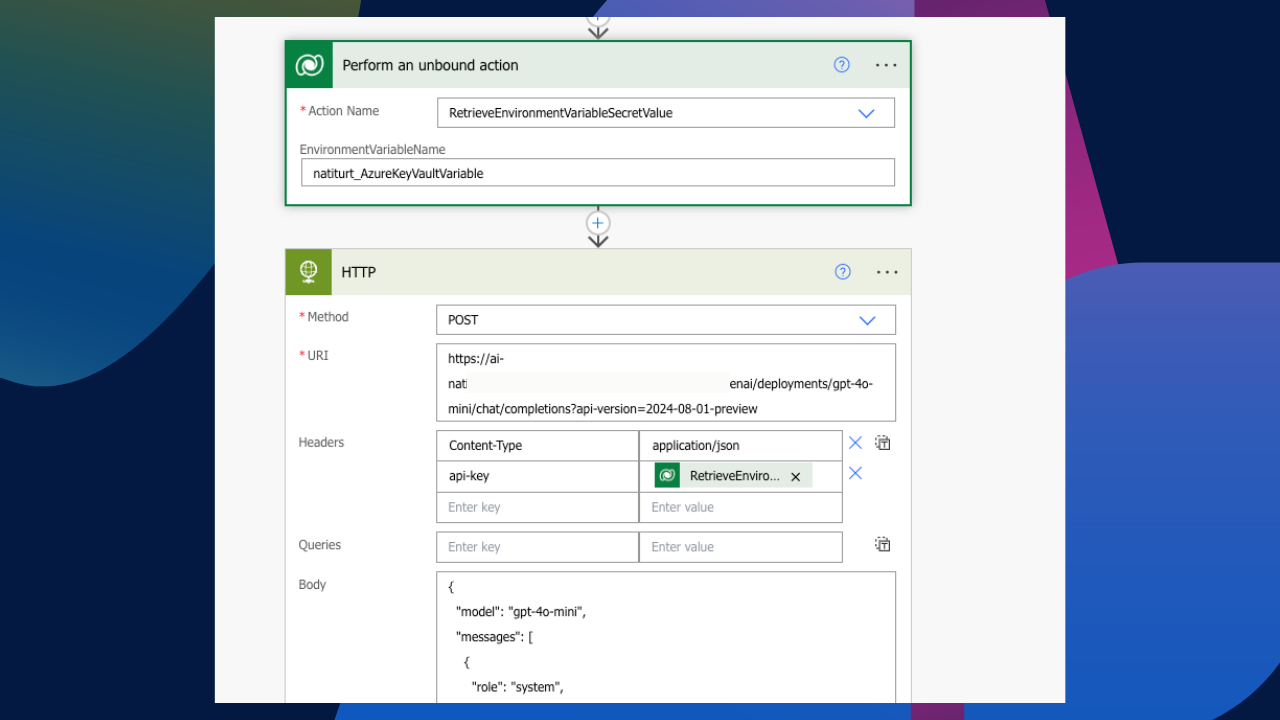
Unlike your standard environment variables, because we are working with secrets, the variable is not just visible for use. We first need to perform a Dataverse unbound action. Let’s create an unbound action and select the action name to be RetrieveEnvironmentVariableSecretValue. Next, we need to paste in our environment variable schema name. It should look something like this.

Using the unbound actions dynamic value, we can then place the response value in the api-key header. Be sure that the dynamic value you are pasting in is @outputs(‘Perform_an_unbound_action’)?[‘body/EnvironmentVariableSecretValue’] as there are two outputs. It should look something like this.
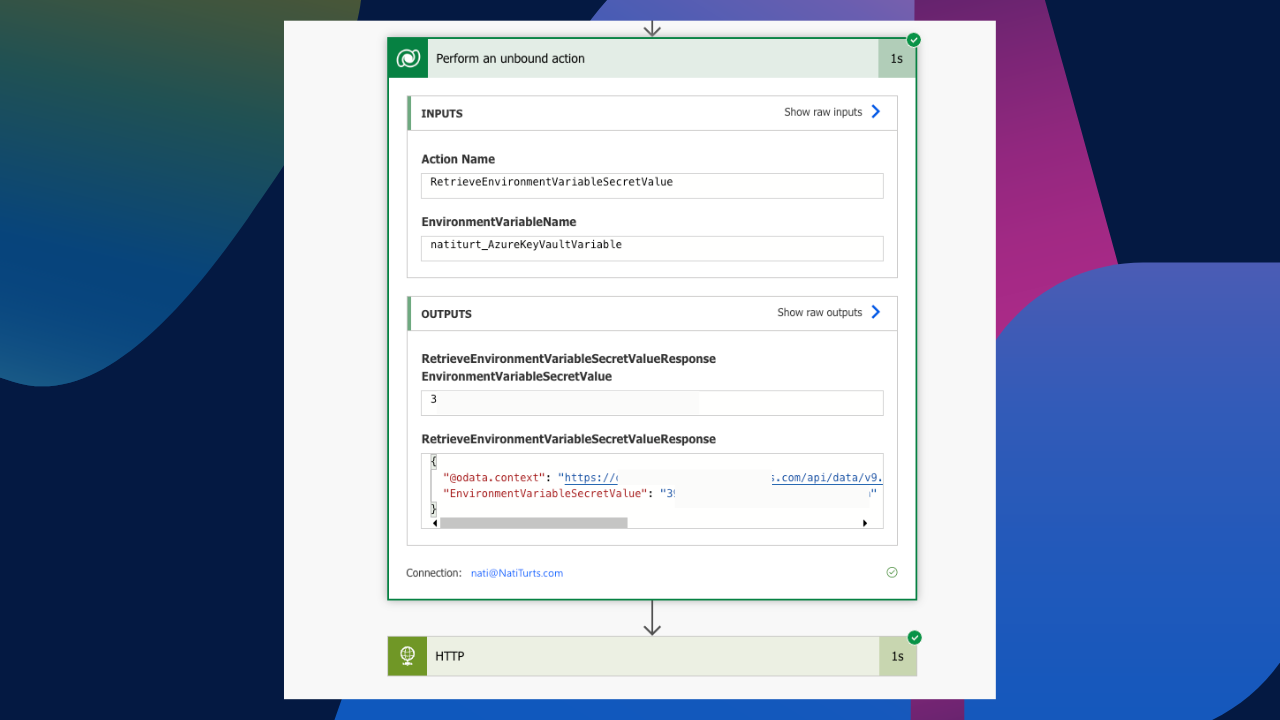
And finally, we can see the flow run successfully. The unbound action retrieved the API key from the vault and allowed us to prompt our model without having to hard code the API key directly in the header.
Securing The Input and Output
If you have not realised by now, despite taking the approach to call the API key through an Azure Key Vault, if we view the flows run history, we can clearly see the retrieved key value displayed in plain daylight. Not really that secure, right?
After posting this blog the first time round, fellow Microsoft MVP, Leo Visser, pointed out a solid approach to solving this issue.
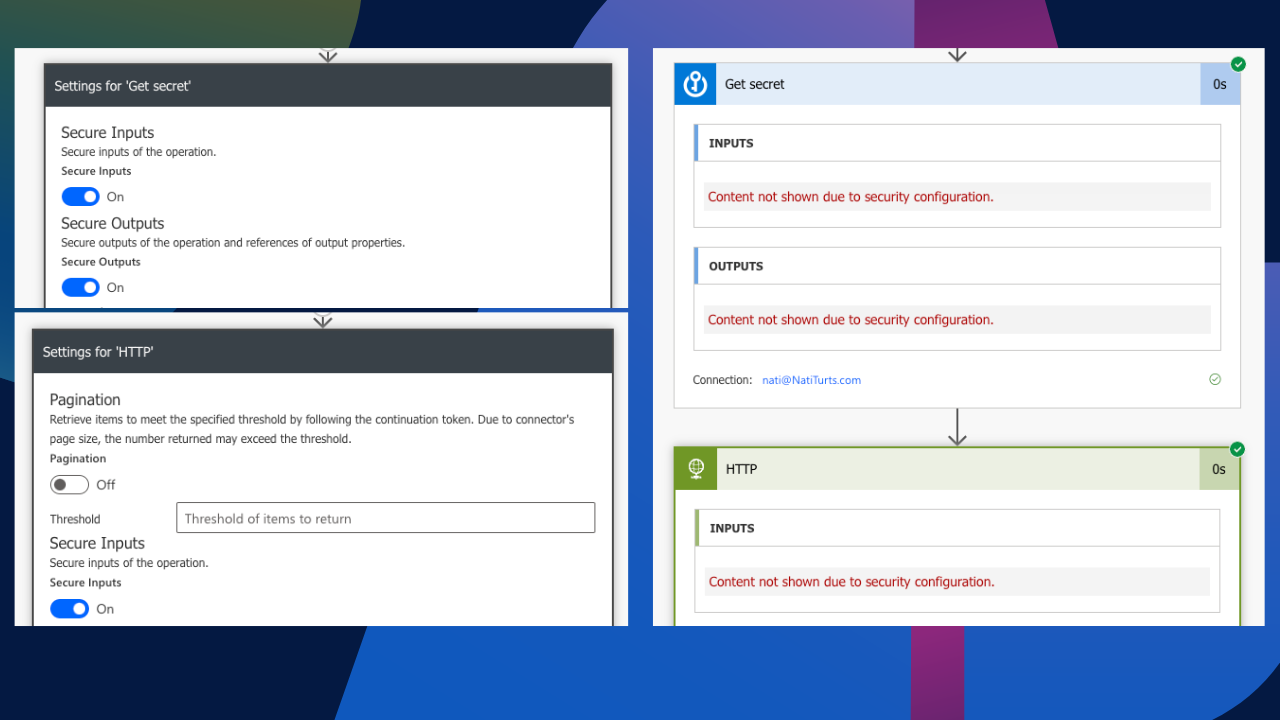
If we select the setting for both the Azure Key Vault and HTTP request actions, we can enable Secure Inputs and Outputs. This will ensure that when the flow runs, the retrieved key as an output will be redacted from being visible in the flow history. This was some really insightful advice.
Conclusion
Although this is a much better option than pasting your API key into an HTTP request header, there are still some downsides.
In my parallel post to STOP EXPOSED API KEYS IN HEADERS, we are going to explore my personal favourite route. A custom connector. Check it out here: Build a Secure Azure AI Custom Connector.
Until then, I hope you enjoyed this post and found it insightful. If you did, feel free to buy me a coffee to help support me and my blog. Buy me a coffee.


