
In my previous post, I was exploring the idea of using Power Platform AI Prompts to build graphs for me by providing it data and asking for an HTML output. Despite a few hiccups, I did get an okayish graph out of it; however, the AI Prompts definitely showed its limitations. In today’s post, I am venturing down the OpenAI route and leveraging OpenAI in Power Platform through an HTTP request. Don’t worry, in future posts I’ll be talking about wrapping this up in a custom connector.
Power Platform AI Builder
AI Prompts Limitations
When I was trialling out the AI Builder Prompts, it became very apparent that it had its limitations. For starters, when creating a text with a GPT prompt that was slightly lengthy and complex, the prompt was unable to generate a response. Furthermore, Microsoft, rightfully so, has applied some heavy content moderation on AI Prompts so broadening an expected response can become a bit tricky.
Credit Consumption
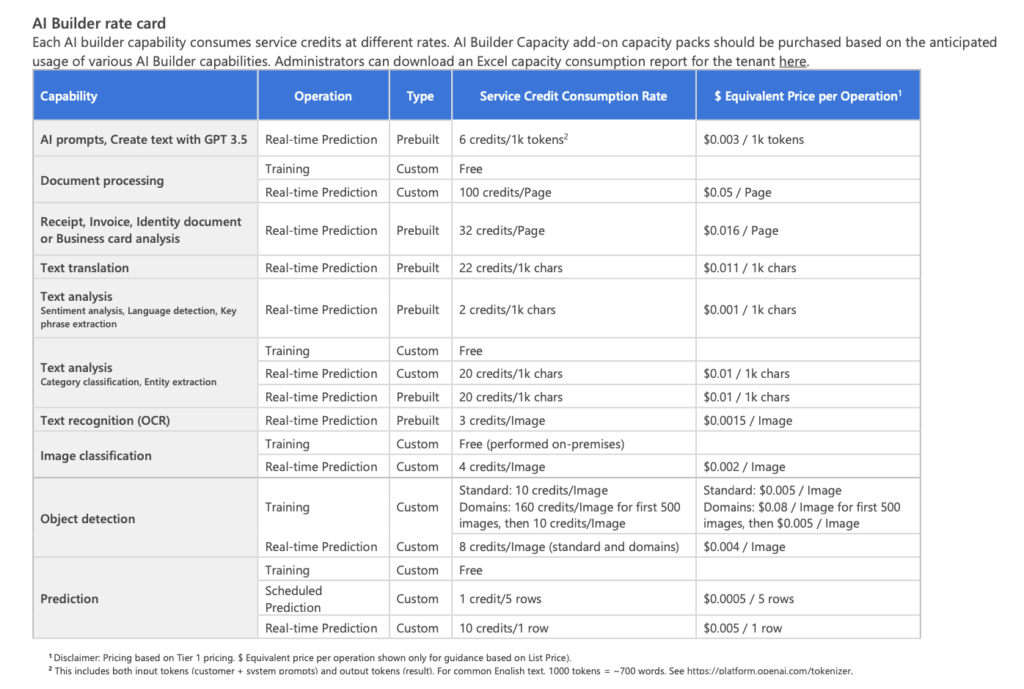
As with all the Power Platform technologies, navigating the treacherous waters of licensing is no easy task. Sadly, AI Builder is even more complex. If you review the Microsoft Power Platform Licensing Guide (download it here), Microsoft makes it seem cheap by monetising the value of an AI operation. For example, in the guide, it is stated that a document processing model basically costs $0.05 per page. And an AI Prompt is billed at around $0.003 per 1,000 tokens.
The tricky bit is weighing up the amount of credits used per capability against the accumulated credits within a tenant. Yes, $0.05 per page for document processing sounds fine, but that equates to 100 credits per page. In a smaller business with 20 Power Apps Premium licenses wanted to use AI Builder, based on the 500 credit allocated per license, they’d only be able to process 100 pages before they reach their cap. If they had 20 Power Automate Premium licenses, this would be a lot better, as this license is allocated 5,000 AI Builder credits per license. That then gives the company 1,000 pages to process.
My irritation is that you become super dependent on having available credit to make use of AI Builders capabilities, and the add-on capacity for $500 seems to become a necessary purchase at some point.
The OpenAI API Platform
Getting Started
To make use of OpenAI’s API and prompt their various models, you need to have an OpenAI Developer API. You can register for one on the OpenAPI Platform here. Once you have registered, you will need to top up your credit account. By just adding $5, you’d be surprised at how far that can take you.
If you would like to keep your OpenAI Platform clean, I’d recommend you create a project to house your API key. Within the project, API Keys and create a new secret key. Be sure to save the key somewhere safe, as you will not be able to view it again through the OpenAI Platform.
OpenAI API Endpoints
When querying any API service, you will need to define the API endpoint. In this case, I am querying the OpenAI API endpoint to interact with the models. The OpenAI API default endpoint is:
https://api.openai.com/v1/Same as you would with any API, you would have various definitions. These allow API owners to define specific capabilities their API can perform and allow us to query it by stating the target definition in the API call. For today’s demo, I am prompting their chat completion definition. So the API endpoint for this would be:
POST https://api.openai.com/v1/chat/completionsHTTP Protocols 101
Taking a slight deviation from our topic, I think it is important to briefly discuss what the HTTP protocols are and what their purposes are. Don’t hate me, but ChatGPT did a decent job summarising it for me.
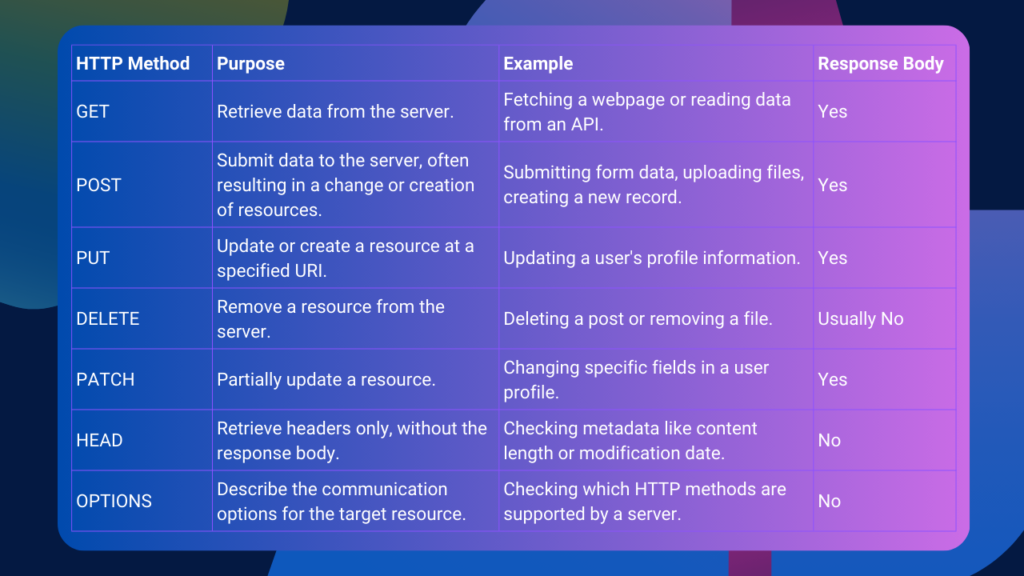
When we are querying an API through an HTTP request, we need to define what you are sending through the API, such as the format of the request and the API Key, so your request can be authorised. When querying the OpenAI API, we need to define the following items in the header:
- Content-Type: In what format will the content be delivered to the API server? For example: application/json.
- Authorization: The API key provided to ensure that your request can be authenticated.
Querying OpenAI with Power Automate
The Request
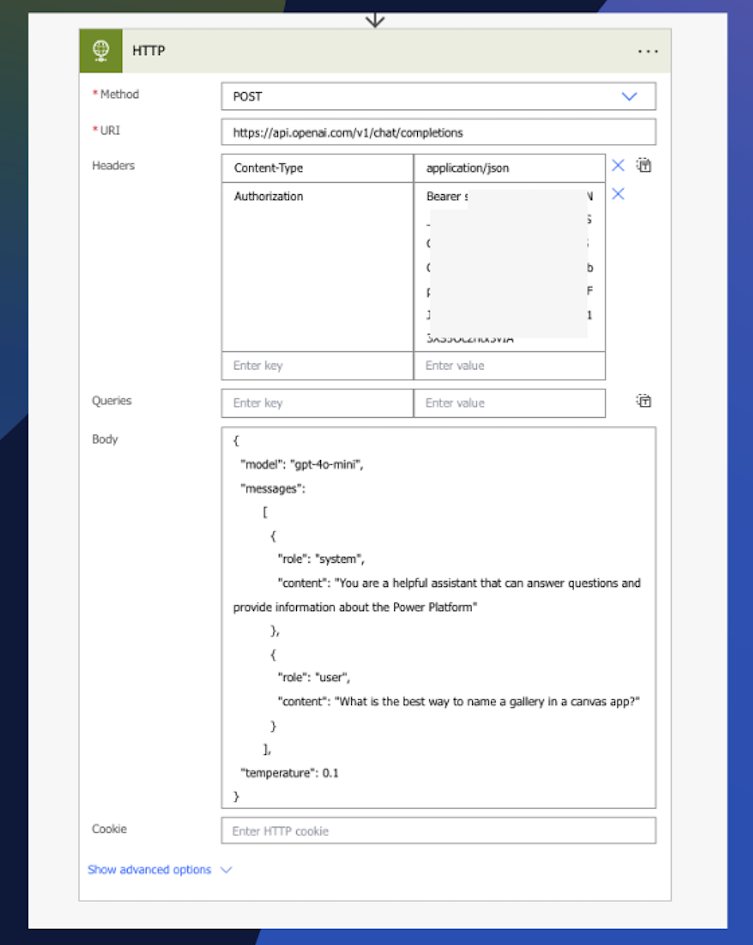
Now that we have covered some of the basics, let’s create a Power Automate flow that queries OpenAI. I’ve created a standard Instant Flow and have added the HTTP action to it. I filled out the values for the HTTP action as follows:
- Method: POST
- URI: https://api.openai.com/v1/chat/completions
- Headers:
- Content-Type: application/json
- Authorization: Bearer {OpenAI API key}
- Body:
{
  "model": "gpt-4o-mini",
  "messages":
        [
          {
            "role": "system",
            "content": "You are a helpful assistant that can answer questions and provide information about the Power Platform"
          },
          {
            "role": "user",
            "content": "What is the best way to name a gallery in a canvas app?"
          }
        ],
  "temperature": 0.1
}
My action looks something like this now:
Let’s quickly review what the body of the request means. These body keys/fields are provided in the OpenAI API documentation here.
Model: To start, we need to define the model we want to use for the query. Within the “model” field, we are stating we want to use the gpt-4o-mini mode.
Message: We are then defining two prompts for the GPT. The first message states the system message, so the GPT and user know its purpose, therefore it’s a system role. The message for these roles helps define the purpose of the GPT so it can provide a more specific response. The next message is the user role. This is the prompt that we are passing into the HTTP request body.
Temperature: Lastly, we’ve included the temperature field. On a scale of 0.0 to 1, this influences how much risk the model can take with its response, i.e., how creative it can be. The higher the temperature, the more creative it will be.
The Response
The output of the request has given us the following response:
{
  "id": "chatcmpl-A1ZR9FgvF1Q0vIeylnCNS4hhp70nm",
  "object": "chat.completion",
  "created": 1724937911,
  "model": "gpt-4o-mini-2024-07-18",
  "choices": [
    {
      "index": 0,
      "message": {
        "role": "assistant",
        "content": "When naming a gallery in a canvas app, it's important to follow best practices for naming conventions to ensure clarity and maintainability of your app. Here are some tips for naming galleries effectively:\n\n1. **Descriptive Names**: Use names that clearly describe the purpose or content of the gallery. For example, if the gallery displays a list of customers, you might name it "Gallery_Customers".\n\n2. **Use Prefixes**: Consider using prefixes to categorize your controls. For instance, you could use "gal" for galleries, such as "galProducts" or "galOrders". This makes it easier to identify the type of control at a glance.\n\n3. **Avoid Spaces and Special Characters**: Stick to alphanumeric characters and underscores. Spaces and special characters can lead to issues in formulas and make it harder to reference the control. For example, use "galEmployeeList" instead of "Employee List Gallery".\n\n4. **Consistent Naming Convention**: Establish a consistent naming convention across your app. This could be camelCase, PascalCase, or snake_case. Consistency helps in maintaining the app and makes it easier for others to understand your code.\n\n5. **Include Context**: If your app has multiple screens or sections, include context in the name. For example, if you have a gallery for products on a sales screen, you might name it "galSales_Products".\n\n6. **Keep It Short but Meaningful**: While being descriptive is important, try to keep the names concise. Long names can be cumbersome to work with in formulas.\n\n7. **Version Control**: If you anticipate making significant changes to the gallery, consider including a version number in the name, like "galProducts_v1".\n\nBy following these guidelines, you can create a clear and organized naming structure for your galleries, making your canvas app easier to navigate and maintain.",
        "refusal": null
      },
      "logprobs": null,
      "finish_reason": "stop"
    }
  ],
  "usage": {
    "prompt_tokens": 41,
    "completion_tokens": 377,
    "total_tokens": 418
  },
  "system_fingerprint": "fp_9722793223"
}
The content field within the message holds the GPTs response. If I format it a bit for this post, the response to the question “What is the best way to name a gallery in a canvas app?” is:
When naming a gallery in a canvas app, it’s important to follow best practices for naming conventions to ensure clarity and maintainability of your app. Here are some tips for naming galleries effectively:
Descriptive Names:
Use names that clearly describe the purpose or content of the gallery. For example, if the gallery displays a list of customers, you might name it “Gallery_Customers”.
Use Prefixes:
Consider using prefixes to categorize your controls. For instance, you could use “gal” for galleries, such as “galProducts” or “galOrders”. This makes it easier to identify the type of control at a glance.
Avoid Spaces and Special Characters:
Stick to alphanumeric characters and underscores. Spaces and special characters can lead to issues in formulas and make it harder to reference the control. For example, use “galEmployeeList” instead of “Employee List Gallery”.
Consistent Naming Convention:
Establish a consistent naming convention across your app. This could be camelCase, PascalCase, or snake_case. Consistency helps in maintaining the app and makes it easier for others to understand your code.
Include Context:
If your app has multiple screens or sections, include context in the name. For example, if you have a gallery for products on a sales screen, you might name it “galSales_Products”.
Keep It Short but Meaningful: While being descriptive is important, try to keep the names concise. Long names can be cumbersome to work with in formulas.
Version Control:
If you anticipate making significant changes to the gallery, consider including a version number in the name, like “galProducts_v1”.
By following these guidelines, you can create a clear and organized naming structure for your galleries, making your canvas app easier to navigate and maintain.
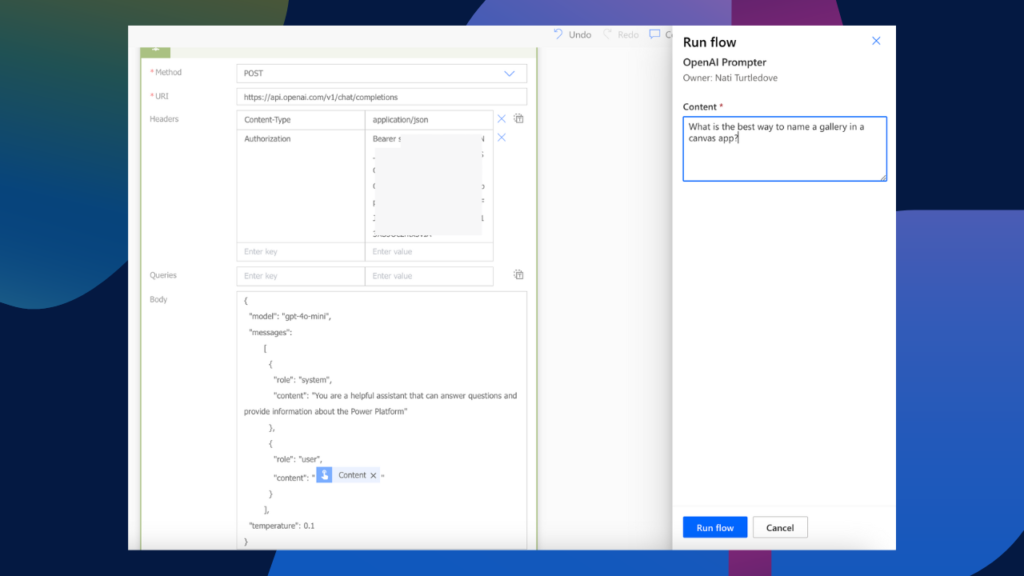
Now if I place a text input value in the flow and replace the message content in the HTTP request body with the input variable, when I trigger the flow, I can pass any question I like into the request.
Token Usage
As I mentioned before, my frustration with Power Platform AI Builder is around its credit consumption model. I queried the same content in a gpt4o-preview prompt with AI Builder and got a similar but not as detailed response; however, when I calculated the estimated token usage, it came to around 350 tokens, which equates to around $0.00105. According to the Power Platform Licensing Guide, the 6 credits per 1,000 tokens ($0.003 per 1,000 tokens) include both input (your prompt) and output (the response) tokens. Whereas with OpenAI’s (and Azure OpenAI Service’s) token pricing priced for input (prompt) tokens only.
If I run my flow with a gpt-4o model to compare the pricing (for gpt-4o it is slightly higher that AI Builder priced at $0.005 per 1,000 tokens), I only use 369 tokens, 41 of which are input tokens. This means that the cost for running my prompt through OpenAI equates to $0.000205.
Conclusion
Based on my limited usage of AI Prompts, I am currently leaning towards it being a citizen developer tool rather than a general developer or architects’ tool. Yes, it can definitely be used in solutions to help end users prompt their way through your data. It ensures your data stays secure within Dataverse and the Microsoft ecosystem. But for enterprise-scale solutions, I personally don’t think AI Builder is ready just yet, and the biggest reason I believe this is simply due to the credit consumption approach. If you are implementing solutions at an enterprise scale and need AI heavily involved in data consumption, I’d recommend making use of the Azure OpenAI service (something I’ll dive into next week).
In my previous post, I was exploring the idea of using Power Platform AI Prompts to build graphs for me by providing it data and asking for an HTML output. Despite a few hiccups, I did get an okayish graph out of it; however, the AI Prompts definitely showed its limitations. In today’s post, I am venturing down the OpenAI route and leveraging OpenAI in Power Platform through an HTTP request. Don’t worry, in future posts I’ll be talking about wrapping this up in a custom connector.
Well, that’s been my journey today. I hope you enjoyed this post and found it insightful. If you did, feel free to buy me a coffee to help support me and my blog. Buy me a coffee.