
Hey again, it’s me. And today I’m back with another security post.
In my previous post, we looked at how we can relate and unrelate security roles to users directly through a Canvas app. We also explored the relationship to the User (systemuser) table as well as how security roles are directly linked to a business unit.
In today’s post, we are reviewing how to update a user’s security role through Power Automate, as well as updating a user’s business unit and thereafter reassigning their required security roles. We’ll also briefly discuss the impact of changing a users business unit and how using Dataverse teams can streamline your security.
The App
In my previous post, I should have a basic Canvas app that called data from the User table and security role table. Using a few local collections and context variables, we were able to quickly use the Relate() and Unrelate() functions to associate and unassociated security roles.
On my add/delete button, I am triggering the below flow and passing in the following parameters:
//Trigger relate or unrelate flow
Notify(
Relateorunrelateselectedsecurityroletouser.Run(
  loc_SelectedUser.systemuserid,
  ThisItem.Role,
  If(Self.Icon = Icon.Add, "Relate","Unrelate")).response);

ClearCollect(col_UsersExistingRoles, loc_SelectedUser.'Security Roles (systemuserroles_association)');
The Flow
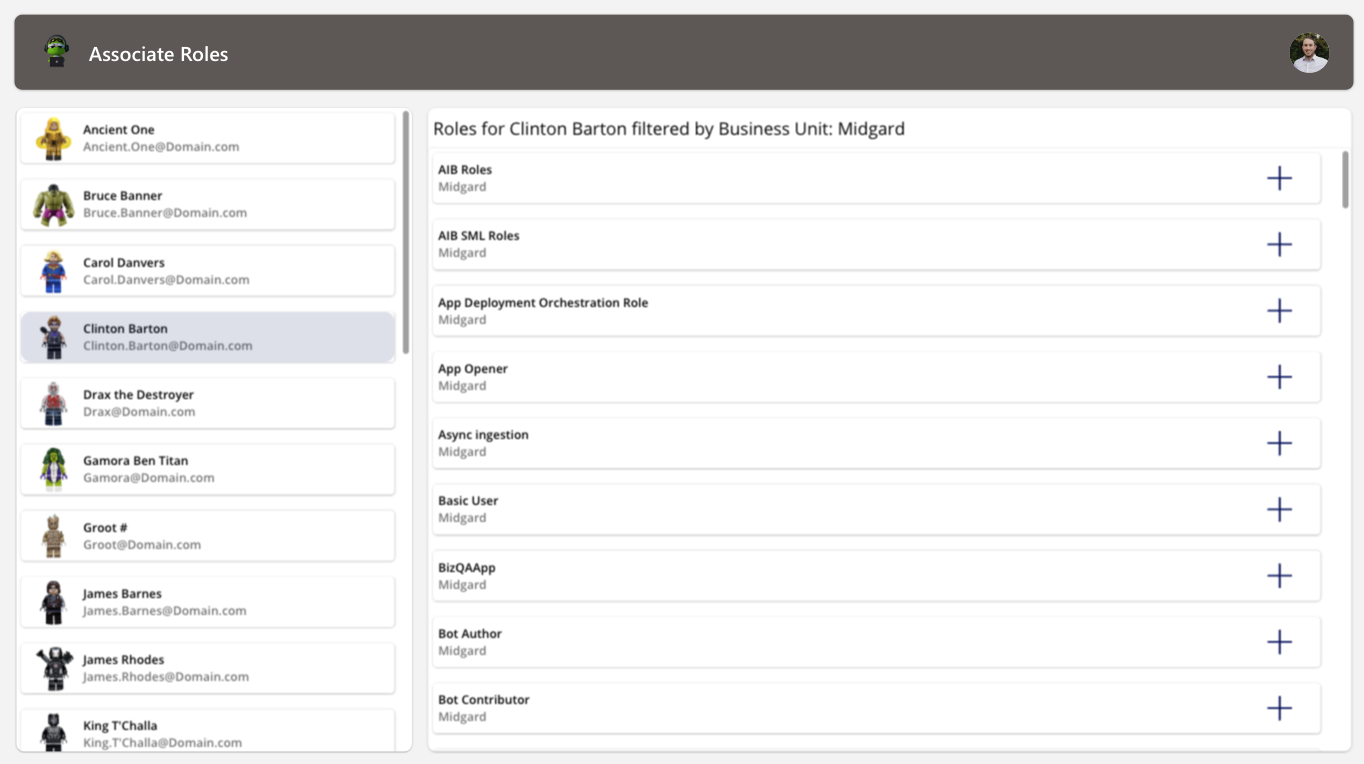
The first flow we’re having a look at is relatively simple. The flow will be triggered directly from the “Add” or “Delete” button in the security role gallery. The flow is configured to request three input values: the User’s systemuserid, the selected security role ID, and lastly, the action type, whether it needs to perform a relate or unrelate action.
Let’s take a look at the flow:

To start off the flow, we’re using a Power Apps trigger. As we just mentioned, this is requesting three input variables. When the flow is triggered, it will run a condition on the action type value. If the input is relate, the flow will switch to the relate action; otherwise, it will switch to the unrelate.
Based on the switch action, we are simply using one of two Dataverse actions. We’re either using the “Relate row” or “Unrelate row” action. Within these actions, we need to define the table we are looking to create or remove the relationship from. In this case, we need to relate the security role to the user, so we are using the Users table.
We then need to select the row we plan to relate or unrelate. That is why we passed in the Users systemuserid from the app into the flow. This ensures that we are relating the security role to the selected user.
As we approach the last two bits, we need to decide on the relationship type. As you scroll through the list of relationships, you’ll notice a vast variety of potential relationships you can work with. In order to successfully relate the security role to the user, we need to use the “Security Role – systemuserroles_association” relationship. The first part of this relationship defines the target table; in this case, we are relating the User record to a record within the security role table. The next bit is showing what field we are relating. For this scenario, we are not necessarily relating an individual field, but rather an entire record. This will be highlighted next.
Lastly, we need to define which security role we are relating to. Being that we passed the security role ID from the app to the flow, you may think, “Great, just enter the security role ID input variable. Works right?”. That’s why we’re touching on OData. OData is defined as an Open Data Protocol that allows us to query data from a URL. Whenever you query records within a Power Automate flow, you’ll notice that the body will always include an OData field for that record. OData acts as an API to Dataverse, allowing us to query records by using the instant url and including a record ID. The response will be an entire Dataverse record instead of just a field value.
When it comes to associating the security role to the user, we need to make sure that we use the correct OData format to relate the role correctly. The URL should include the full https protocal followed by your environment url. This is usually made up of the business unit name that was generated upon the environment’s creation, followed by the region the environment is hosted in. It should look something like this: org123123.crm4.dynamics.com
Now we need to combine the API protocol and request the role ID. An example of this would be:
//oData format for relation
https://org123123.crm4.dynamics.com/api/data/v9.1/roles(15813b0d-88cc-402f-882d-03730bc41381)
In the case of the flow, I will be replacing the role ID “15813b0d-88cc-402f-882d-03730bc41381” with the security role ID input variable. It should look something like this:
https://org123123.crm4.dynamics.com/api/data/v9.1/roles(@{triggerBody()['securityROleID']})
This ensures that we query the entire security role and relate the record to the user, not just a column.
As to why we need to use the OData record instead of using the security role as a lookup record, I have no clue why.
The Impact of Changing Business Units
The next item we’re going to discuss is the impact changing a users business unit has on their existing security roles.
In a scenario where you are not using Dataverse Entra ID teams (check out how to use them here: Dataverse Teams: A Triple Threat as they are great for streamlining security role association), when a user’s business unit changes, their roles get lost as well. The reason this occurs is due to how security roles are created and stored. If you take a peek into the Security Role table, you’ll notice that you have a security role per business unit. So when you associate a role with a user, you are associating the role on a business unit level. When you change the business unit, that association breaks and the roles need to be reassigned.
A problem with managing all security through the Admin Center often leads to issues like this. You’ve changed a user’s business unit; now you have to update all their security roles. But once the business unit has changed, you have a very limited way of referencing what roles they held before (again, let’s rather use Dataverse teams ).
In this scenario, I am using the same Canvas app to manage a users business unit, and I am using a flow to pass through the users new settings.
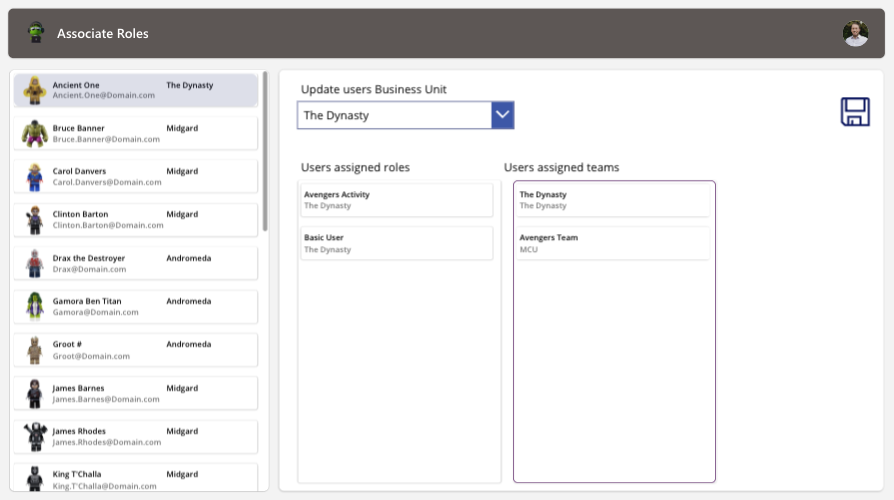
In this app, I can select a user, select a new proposed business unit, but I can also retrieve all their existing security roles from their current assigned business unit. When I select a user, I am collecting their existing roles into a local collection:
//Set local variable to the selected user
UpdateContext({loc_SelectedUser: ThisItem});

//Collect the selected users existing associated security roles
ClearCollect(col_UsersExistingRoles, loc_SelectedUser.'Security Roles (systemuserroles_association)');
On my business unit dropdown, I am also creating a new collection in the OnChange property to collect all the security roles the user already has, but with the role IDs from the new proposed business unit:
//Create collection for new roles that need to be assigned
ClearCollect(col_NewSecurityRoles,
    Filter(col_SecurityRoles,
        And('Business Unit'.'Business Unit' = Self.SelectedText.'Business Unit',
        Name in col_UsersExistingRoles.Name)))
On my save button, I am triggering a new flow and passing in the following parameters:
//Trigger flow to update users BU and re-associate the security roles
UpdateuserssecurityroleuponBusinessUnitchange.Run(
    loc_SelectedUser.systemuserid,
    drp_SelectedBU.SelectedText.'Business Unit',
    JSON(col_NewSecurityRoles)
)
Now that I have the users ID, the new business unit ID, and the new array for security roles related to the new business unit, I can trigger a flow that will update the users business unit and re-associate their security roles. Let’s take a look at the flow:
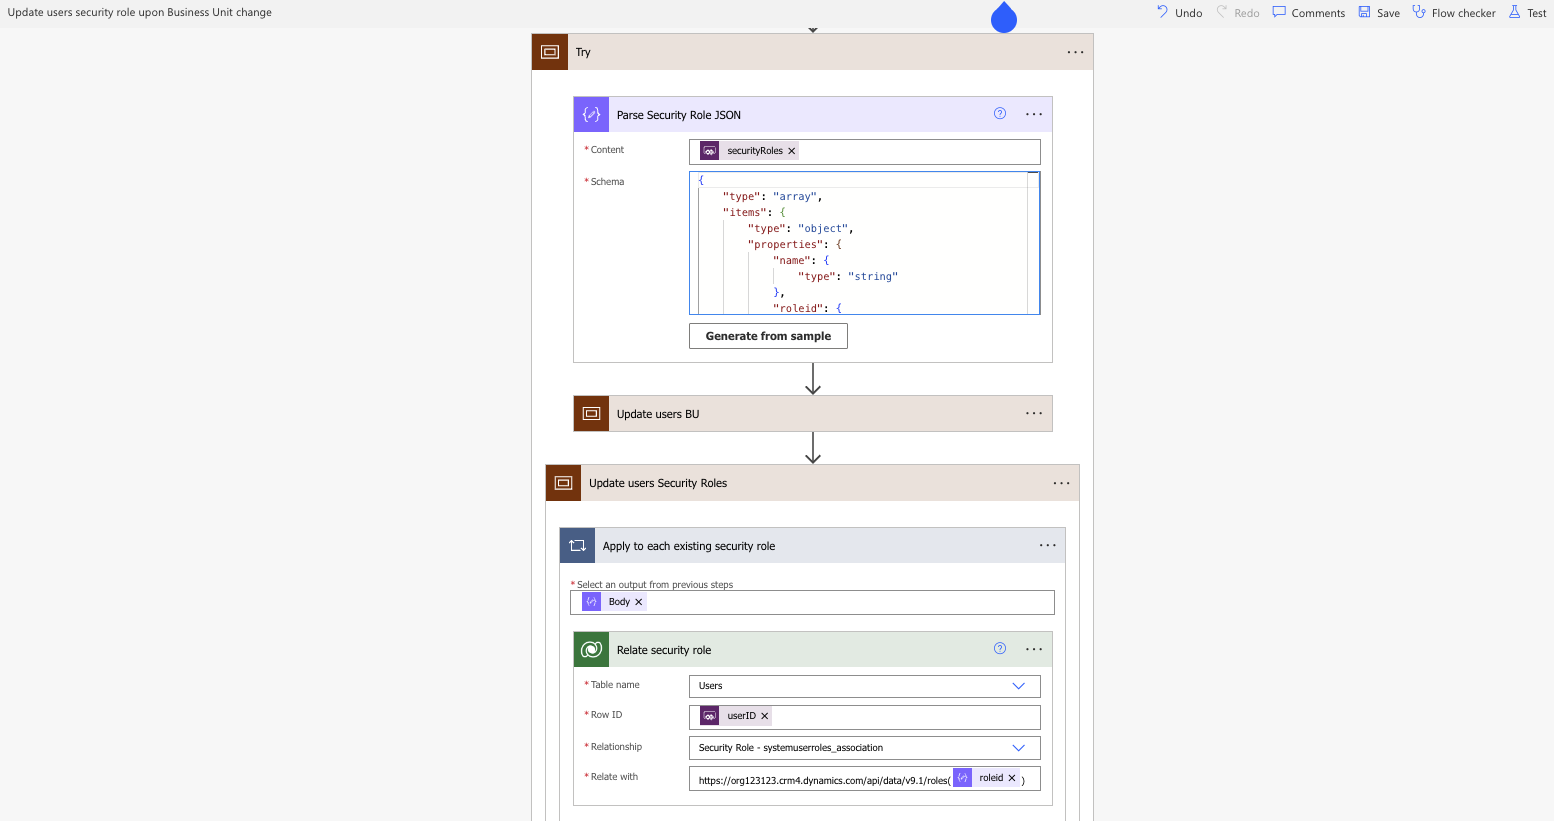
To start, I’ve initiated 3 input values to be passed from the Canvas app to the flow. The users ID, the new business unit ID, and the array of new security roles.
I’m going to parse the JSON array from the Canvas app (the parameters from the Canvas app will be shown very soon, I promise) and then use the Dataverse action, Update a record. I’m updating the User table and am passing the user ID into the Row ID field, and I am updating the Business Unit lookup field with the business unit ID provided by the app. This will now update the users business unit, and they will lose their existing security roles.
The next piece of the flow will take the array of security roles and relate them to the user. Similar to the above relate function, I am using the Relate row action and am relating the userID row. I am also using the Security Role – systemuserroles_association” relationship and am passing the roleid from my PARSE JSON action into the OData url. Because I am passing a record from an array, the relate action will now be nested in an Apply to each, which will ensure that all the roles we passed through the Canvas app are related to the user.
And just like that, we’ve created a simple process that allows you to manage user security roles directly from a Canvas app as well as change a user’s business unit without the user losing their previously associated roles.
Conclusion
There are many ways one can manage security processes within the Power Platform. When it comes to managing security roles, we’ve explored role association from the Admin Center, Canvas apps, and flows. Based on your requirements, you may approach role association differently.
What I can say is that managing security roles through Dataverse teams does help streamline role inheritance and association. It mitigates the need for these apps and flows. However, in scenarios where you need instant updates, this is a great option. Dataverse teams can take a bit of time to provision updates, where these approaches are instant. Again, it’s all based on your requirements.
Hope you enjoyed.


Hello Nati, How change users business unit by powerapps canvas operations? Is that could be done?
Hi Victor. It can be done through patching the User table. The reason I recommend using Power Automate is because changing a users BU resets their assigned security roles, and it’s easier to re associate the roles with the business unit change in one flow.