

Security Role Association – A Power Apps Version
It’s been a while; lots going on that resulted in a well-needed break. But all is good now. We’re back on track with some exciting security posts.
In this post, we’re going to dive into various ways you can get your security basics off the ground. This includes assigning security roles, business units, and line managers through automation. There are various means to manage a user’s access and privileges, such as their business units, security roles, managers, etc. The most common place to maintain this is via the Power Platform Admin Center. When dealing with a smaller number of users, this is an ideal option to maintain your users. However, when dealing with thousands of users in an environment, and you need to delegate permissions to other users to maintain user business units, security roles, and other privileges, granting these users access to the Admin Center does not sound like the best plan. So how do we move forward?
User (systemusers)
One of my favourite tables in Dataverse is the User table. This table, in my opinion, is the centralised location to manage user security if you are building a complex security model and need a solution to maintain an RBAC (role-based access control) infrastructure.
The user table basically consists of all active users within that environment. If you have an associated Entra ID security group to govern access to your environment, the user records in the User table should align with members of the security group. There will be some discrepancies in the User table. It may consist of users that are disabled, include other Global / Power Platform Administrators, and also include various service accounts or application users.
When it comes to the User table, you can control a vast majority of user access and privileges simply by having read-write privileges to this table. If you need to create a custom security role for your users to access this table, be sure to allow append and append to privileges across the required lookup tables. For basic security purposes, I’d say the basic lookup tables are:
- Business Unit
- Security Role
- Positions
- Microsoft Entra Id
With these tables in mind, applying security privileges to users through the User table becomes extremely efficient, whether you are using Power Apps or Power Automate.
As a quick side note, when using the Users table, there are two different user ID fields to keep an eye on. You have your standard table GUID called systemuserid. This field defines the user record within the current environment. Additionally, we also have the Azure Object ID. This ID relates directly to the user’s Entra ID record, allowing you to also interact with the user’s Entra ID account through this table if required.
Assigning Business Units
If we refer back to the post “A Tale of Privilege: Business Units and Security Roles,” we discussed how users can live in separate business unit entities, allowing a secure segmentation of data. The question now is: How do we manage a user business unit? The classic answer is through the Power Platform Admin Center. Navigate to the target environment, select users, select the user that needs the business unit change, and select the new business unit. You’ll also be able to reassign all their previously owned records to either another user or the same user within their new business unit.
Now, the problem comes in when you don’t want everyone to have access to the Admin Center, but there’s still a need.
Keep in mind that security roles are associated on a business unit level. If we take a look at the Security Role table, we can see that a single role is cascaded per business unit within the environment. If a user’s business unit were to change because the role associated with them was done on a business unit level, the change would cause the association to break. Therefore, the roles would need to be re-associated with those users after their business unit has changed.
A similar theory applies to managers and positions. Say you want to assign a manager that falls in business unit A to a user that falls in business unit B; the hierarchy model will not allow this. Further, you will get a nice error message if you attempt to create a hierarchical loop. What does that mean? Say you have Tony, who reports to Nick. Tom then reports to Tony. So our hierarchy looks something like this:

If we were to assign Tom as Nick’s manager, this would result in a hierarchical loop.
When it comes to updating a user’s business unit, it’s rather simple. We just need to update the Business Unit lookup column for that user record. Whether you’re doing it through a flow or a patch in Canvas, just reference the business unit ID from the Business Unit table and ensure you update the lookup column accordingly.
Assigning Managers and Positions
Similar to updating a users business unit, updating a users manager or position is relatively the same. The difference is that for a manager, we need to ensure we are updating the manager lookup columns with the manager systemuserid (yes, the manager field is a self-lookup within the user table). When updating a position, we need to lookup the position within that user’s business unit from the Position table.
Managing a users business unit, manager and position is relatively simple. In a future post, we will review how this can be managed through an MDA, Canvas App and Power Automate. We will also look at some validation to business unit and hierarchy changes ensuring that security roles are updated.
Assigning Security Roles
Assigning security roles outside of the Admin Center is actually pretty straightforward. When doing so, we don’t actually use the security role ID from the table but rather the entire record itself. In Power Apps, it’s rather simple, as we can call the role into a gallery and associate it using a ThisItem in full (we’ll cover this a bit more soon). Whereas in a Power Automate flow, we need to use the oDataId for that record. Reiterating what we mentioned above, a security role needs to be associated at the business unit level, and the user doing the association needs to have privileges to the Security Role table.
The actual association is slightly different than just updating a column on the user table. For security roles, we need to use the Relate / Unrelate function. In Power Apps, this is a simple Relate() FX function. In Power Automate, we need to use the Dataverse Relate / Unrelate Record action. We will demonstrate these use cases really soon, I promise.
Associating Security Roles with Power Apps
Now comes the actual fun part. Let’s apply all of the above to a Canvas app. Yay!
For starters, let’s create a local collection called col_Users and collect users from the User table. Next, let’s create another collection for our security roles called col_SecurityRoles.
Let’s pop these two collections into two galleries next to each other.
In the gal_User gallery, I’ve added a button so I can select a user. Included in this OnSelect, I have also created a local variable and am collecting an additional collection.
//Set local variable to the selected user
UpdateContext({loc_SelectedUser: ThisItem});

//Collect the selected users existing associated security roles
ClearCollect(col_UsersExistingRoles, loc_SelectedUser.'Security Roles (systemuserroles_association)');
The first part of the code sets the local variable called ‘loc_SelectedUser’ to the user we select in the gallery. The next piece then creates a local collection of all the security roles already associated with the selected user. This collection will become helpful in the next bit. You can even show this local collection in a separate gallery just to view a user’s existing associated roles.
In the gallery for the security roles, let’s now filter the collection to only show the security roles within the selected user’s business unit. I’ve also sorted the security roles in ascending order. The code should look something like this:
Sort(
    Filter(col_SecurityRoles, 'Business Unit'.'Business Unit' = loc_SelectedUser.'Business Unit'.'Business Unit'),
Name, SortOrder.Ascending)
This should now filter the security role gallery to only those roles within the selected business unit. An example of how I’ve placed my users next to the list of roles can be seen below:
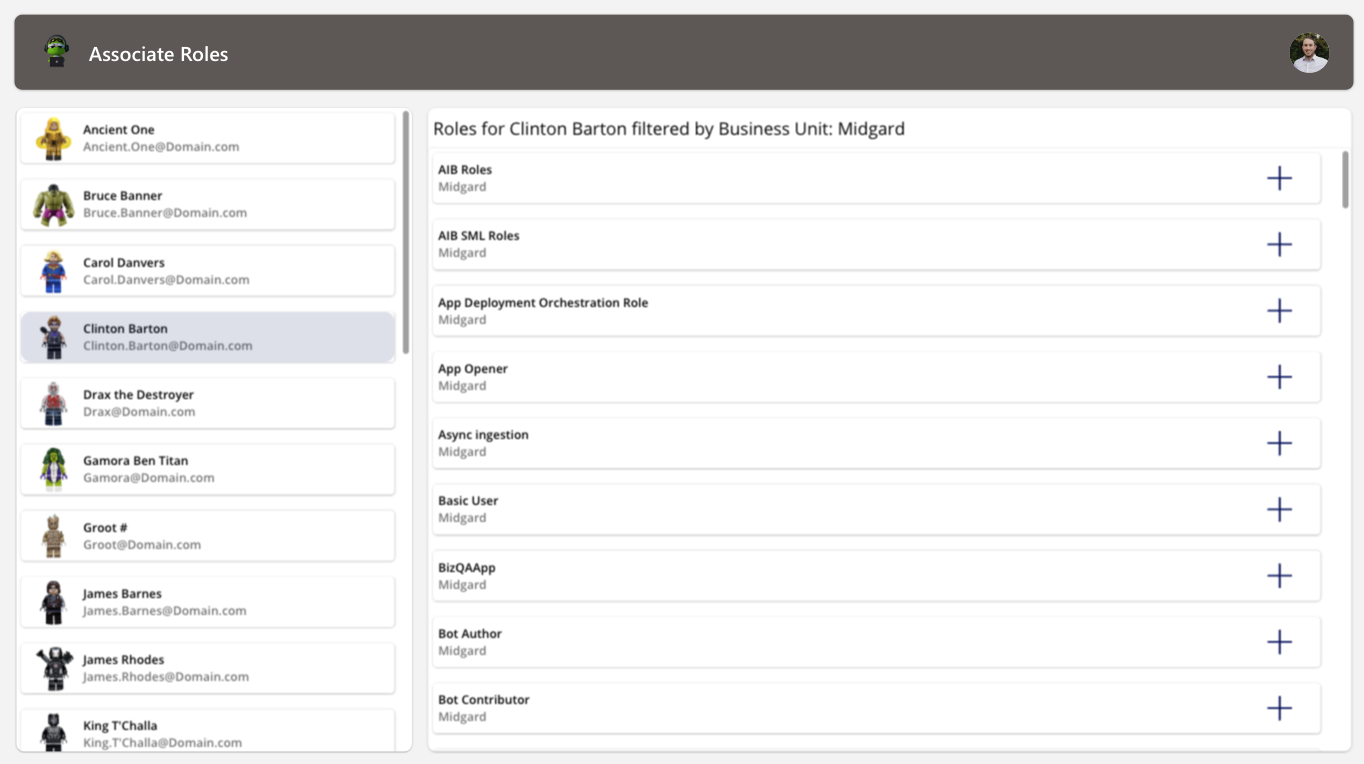
I’ve added an icon as well to the gallery to allow us to add and remove role associations from a user. For the icon itself, I’ve placed the following code in the Icon property to validate if the user already has the role associated with them:
//Does the user have the role associated already?
If(ThisItem.Name in col_UsersExistingRoles.Name, Icon.Trash, Icon.Add)
Ultimately, the icon will visualise the ability to associate or unassociated the role based on the user’s existing roles.
Lastly, let’s place the actual association code on the icon now.
//Relate or unrelated the role based on the users existing associated roles.
If(Self.Icon =
    Icon.Add,
        //Add user security role and update users current role association
        Relate(loc_SelectedUser.'Security Roles (systemuserroles_association)', ThisItem);
    Icon.Trash,
        //Remove user security role and update users current role association
        Unrelate(loc_SelectedUser.'Security Roles (systemuserroles_association)', ThisItem);
);

//Collect the selected users existing associated security roles
ClearCollect(col_UsersExistingRoles, loc_SelectedUser.'Security Roles (systemuserroles_association)');
Now, when you click the ‘Add’ icon, the app will associate the selected security role with the selected user. This can be validated by viewing the user’s associated security roles through the Admin Center. Additionally, if you click the ‘Trash’ icon, the role will be unassociated from the user.
That’s it. It’s really simple to build a basic Canvas app to start managing security roles outside of the Admin Center. Be sure, though, to ensure that users interacting with this type of app have the required privileges to access the tables we mentioned above. In the next post, we will be reviewing how to manage a similar process through Power Automate flows.


Hello Nati, thanks for this article. It is quite simple but the user doing the role association part has to has the system admin role right ? Because I’m trying to this for a user that as is a “Functional Admin” (custom role) that has all the appropriate rights on the User and the Security role table and it doesn’t work.
Hi, thanks for reading the post.
I have not yet attempted to create custom “admin” roles to deal with security role association. With the User and Security Role tables being the core tables required, one could assume this is all that you need access to. However, I don’t believe this is the case. Based off previous engagements and other solutions, one does need the System Administrator role within the selected environment in order to associate a role.
It’s definitely worth exploring this more so if I manage to find something, I’ll let you know. If you do find a way forward, I’d love to hear about it.